Followers

Click on photos to enlarge.

Wednesday, October 24, 2012

Winter Friends


Hello and good afternoon.

Here I am posting late in the afternoon again because I haven't yet figured out when is the best time to post.  And it brings to mind the question of how do bloggers get their cards created by, say, 8:00 a.m. for a brand new challenge that has been posted that very day?  Do they get up at the crack of dawn?  Do they craft in the middle of the night?  I had been making my cards one day then posting them the next morning, which always keeps me a day behind.  That's fine for some challenges but not others.

So my question to my fellow bloggers is this:  HOW do you get a card made so early in the day on the first day of a challenge?  Any and all answers will be appreciated.

On to the card.  I made this using today's sketch from over at SplitCoastStampers.  I knew from the moment I laid eyes on it that I was going to love working with it.

I made the card into a 5.5" square instead of the standard A2 size, and instead of the corner pieces going underneath, I put them on top as snowflakes and the button/sentiment.  And only now am I noticing that I've put Layer 4 in the wrong direction!  HA!  But it looks fine to me, probably because Layer 5 is a circle instead of a rectangle.  *phew!*

The colors are simple and few, which is a refreshing change from my more recent cards.  They are Cherry Cobbler, Baja Breeze, Whisper White and watercolor paper, plus SU's Snow Festival DSP.  The image is Snow Gifts from Mark's Finest Papers, a Heinrich Co., and it has been stamped with Black Staz-On and colored with SU markers and a blender pen.


The snowflakes have been glittered with Dazzling Diamonds, and the two larger flakes have been centered with glittery brads from Michael's while the smallest ones have a touch of Stickles in their centers.


The button and baker's twine are from SU.  This was a fun and relatively (for me) quick card to put together.  

Thank you for visiting me and maybe giving me some insight into how all of you talented crafters out there do their thing so early in the morning!

Happy Crafting!!

Challenges entered:

SCS Weekly Sketch - SC408
CCEE1242 - Snowman
Fussy and Fancy Challenge 74 - Anything Goes
Drunken Stampers Challenge 102 - Napoleon's Buttons (and/or brads)
Creative Inspirations - Anything Goes 
Anything Goes - Make your Own Embellishments
Pile It On #43 - Any Holiday


Tuesday, October 23, 2012

Bubble Kitty


Hello!  Again!

I'm posting late in the day rather than first thing in the morning as I want to sneak my card in before the deadline for this gorgeous color challenge, that from the talented Design Team over at CR84FUN.
 

The colors were sooo delicious that I just HAD to make this card, the stamp set of which I recently received and have been dying to play with.  It fit the bill perfectly.  So without further ado, here is my card.


Isn't she a hoot?  The image, Bubble Therapy from The Cat's Pajamas, was stamped with black Staz-On on watercolor paper and colored with SU inks and the blender pen, then die cut with Dienamics Ovals Stax 1 and layered with Stax 2 and SB Labels 20.  Her eyes, nose (or is that her mouth?) and hair bow were colored with Gelly Roll sparkle pens, and a tiny rhinestone was adhered to her bow.  The bubble outlines were stamped in Bashful Blue and filled in with Aleen's Paper Glaze for dimension.

CS is SU (Crumb Cake, Very Vanilla, Blushing Bride, Subtles DSP Stack) except for the striped layer, which is MME Lost and Found - Madison Ave.  I sponged the pink background layer with a just a smidge of TH Tea Stain distress ink to tone down the pink a bit.


The bathtub started out being way too pink as well, so I brushed on Creative Inspirations paint in Ivory to tone it down which also added a nice "bathtub-y" sheen.  The rhinestone swirls are by Recollections, as are the pearls, which I colored the very palest of blue with a Copic marker in keeping with the bubbles on the image.  A few more tiny rhinestones on the sentiment and some pink seam binding finish things off.  Oh, and of course some SU Dazzling Diamonds for her necklace, dahling.  It's NOT easy being Queen.


Thank you for looking, and here's to relaxing the way only felines know how to do.

Challenges entered:

CR84FN Color Challenge - Lt. Pink, Tan, Cream
Ladybug Crafts Ink - Need a "P" (pink, pearls, pussycat)
and last but not least, this week's sketch from
The Sweetest Thing - Sketch #170


Autumn in a Texas garden

Hello, fellow bloggers!

It's that time of year when Texas gardens are shaggy and in need of serious cleanup, yet so many plants are still full of blooms.  Witness my Mrs. B.R. Cant rose, a sample of which is shown here. 

If that isn't an in-your-face rose, I don't know what is.  This bloom is about 3 1/2" in diameter and smells so heavenly sweet.  I paused frequently in today's labors to enjoy her.  I'm not showing the whole plant because she was severely deformed by a huge oleander rudely growing all over her but which now isn't huge anymore.  Trust me when I say the 7 ft. rose still has many blooms on it.  I pruned back the oleander, which was probably 10 ft. tall, and a giant pittosporum that had covered up a living room window.  And now the living room has more natural light once again!

The stars of this fall Texas garden are the lovely asters.  

 Oh how I do love asters.  They grow like weeds here in the full, blistering summer sun and wind with nary a complaint.  A single hard trim in mid-summer ensures blankets of blue (really purple, but "blue" in the plant world) for Halloween.  I started these three plants (and yes, they really are only three plants, two in front, one crowded one in back) from cuttings 3 years ago and put them in the ground 2.5 years ago.  From single cuttings.  THAT'S how fast and big they grow.

 I will be digging them almost completely out after they bloom and sharing them with neighbors and anyone else who wants a friendly, uncomplaining guest to their garden.

Note: I see the head gardener left her wheelbarrow and oleander cuttings in full sight so as to mar the picture.  *sigh*  It was a working day.

Today's card is a simple one since the designer was hard at work earlier in the day on the aforementioned garden cleanup.

I used the same "Grunge Resist" method as yesterday's card with different stamps and inks.  I discovered that distress inks work better as they have more "slide" than SU inks which tend to grip the paper too much, dry too quickly, and leave too many streaks.  I used So Saffron for the base coat, then TH Vintage Photo and Victorian Velvet for the additional colors.  Stamps used were Flourishes Witching You a Happy Halloween and All That Glitters, Penny Black (candle), Gourmet Rubber stamps (chair).  CS is Basic Black, Pumpkin Pie, and glossy white.  Inks used are Versamark and Staz-On Black.  Two SU rhinestone brads finish things off.  CAS all the way!

Thank you for visiting me in my garden, and I hope you have a lovely day.  Happy Crafting!!

Challenges entered are:

FOSTV Challenge #43 - Halloween or Harvest
Simon Say Stamp Challenge - Eerie
Charisma Cardz Challenge #41 - CAS
Fussy and Fancy Challenge #74 - Anything Goes
Drunken Stampers Challenge #102 - Napoleon's Buttons (buttons and/or brads)
Creative Inspirations - Anything Goes


Monday, October 22, 2012

Spooky

Hi and good morning!!

In light of this being what I call "Spooky Month," my family and I frequently watch spooky movies.  Today I went to see Paranormal Activity 4 with my daughter.  The first three, which I watched on dvd at home, scared me half senseless, so I was anticipating being scared to the nth degree to see this one on the big screen.  Ummm. . . not so much; however, today's card ties in nicely with the movie - it's creepy and spooky and...eerie.  The technique, however, is anything but.  It was relatively quick and very fun to do with almost guaranteed results.  I read about this technique in the October 2012 issue of Scrap & Stamp Arts, and it was invented by Bibi Lindahl whose blog is referenced here.  


Is that not the coolest technique??  It's called "Grunge Resist," and  I haven't even cleaned my craft room up yet because I want to make another one or two.  I love the finished look, but what I also love is that you don't need a lot of embellishment on a card like this.  I added two grey rhinestones and that was IT.  Black base layer, Poppy Parade first layer, then white glossy CS for the top piece.  Versamark, stamps, inks, a baby wipe, some water in a mister, Staz-On, and a small piece of sandpaper are all that's needed for a CAS card that doesn't look it!  I don't do very many CAS cards because I usually like a lot of layers and embellishements, but this card begs to be CAS.


The magazine edition is still in print, so get yourself a copy soon and play with this technique.  Think of the color and stamp possibilities.  I have exactly one Halloween stamp set, but as evidenced by the bird and picture frame, other images can look spooky too when done using this technique.  

Thank you for looking, and here's to spooky movies.

Happy Crafting!!

I've entered this card in these challenges:

There She Goes Clear Stamps TSG177 - Halloween/Fall Theme
Simon Says Stamp Challenge - Eerie Inspiration
Charisma Cardz Challenge #41 - Clean and Simple
Fussy and Fancy Challenge #74 - Anything Goes
Creative Inspirations - Anything Goes
Squigglefly Challenge #42 - Fall (Colors or Holiday) Theme


Sunday, October 21, 2012

Rustic Elegance


Hello and good morning!

Today's card was made for the challenge over at The Shabby Tearoom, the theme of which is "Rustic Elegance."  Participants are to use the colors in the inspiration photo and include something rustic and something elegant in their card.  Here is my card...

 ...and here is the inspiration photo.
I love the juxtaposition of "rustic" with "elegance" and tried to incorporate an even balance of both in this card.  It is pretty easy to see which is which.  The card base is Blushing Bride and the first layer is Very Vanilla stamped with a wood grain stamp (name unknown) and sponged with TH Distress Ink Tea Dye and SU Pretty in Pink, then distressed with the SU distress tool and inked up on the edges (rustic).  The floral layer is K&Co. Classic K dp, then a strip of my old sheet music is applied on top.  The diecuts are Dienamics Oval Stax One and Two and SB Floral Oval underneath.  Also diecut are Mini Tabs Quartet and Fancy Flourishes, both also by Dienamics.  This card is 5x7 so as to be able to accommodate everything.


The image, IO Simple Pleasures, was stamped onto watercolor paper with black Staz-On and colored with SU markers and a Blender Pen, and the butterfly is embellished with Dazzling Diamonds (elegant).  I used a Gelly Roll sparkle pen on the little curls and flourishes on the image as I have several teacups in my collection that are embellished with gold on their surfaces.

The bow is cream seam binding, and the felt rolled roses were made with Dienamics Mini Rose dies with the addition of a small bit of burlap underneath (another bit of rustic).  I made the sparkly pearl and bead decorative stick pin myself and finished things off with two pink SU rhinestone brads and a tiny silver key charm as the inspiration photo had the mercury glass candlesticks which added a nice metallic gleam to the arrangement (elegant).

I hope you have enjoyed my card - I certainly enjoyed making it!  Have a wonderful day, and Happy Crafting!

Challenges entered:

The Shabby Tearoom Week #136 - Rustic Elegance
Alota Rubber Stamps Challenge #93 - Birthday Celebrations
Tuesday Throwdown #120 - Tea at Granny's
Anything Goes Challenge #78 - Make Your Own Embellishments
Fussy and Fancy Challenge 74 - Anything Goes
MFP Speedy Fox and Friends Challenge #130 - Leaves (there are some on the cup!)
Drunken Stampers Challenge #102 - Napoleon's Buttons (buttons and brads)
SCS HYCCT1219 - A Birthday in Pink
and last but not least,
My Favorite Things Weekly Sketch Challenge - MFTWSC94


Saturday, October 20, 2012

FABULOUS DAY!!

Hello and good morning!!

I'm still on a high from yesterday's wonderful day.  For starters, my DD came over for a full day of crafting.  We are decoupaging right now, though for the past few months we had been mosaicing instead.  (See here and here.)  Her normal routine is to arrive around 8:45 a.m. and leave around 9:00 pm after we've had dinner and watched either a movie or some favorite taped tv shows.  Tonight, in keeping with Spooky Month, we watched a scary movie.  

After she left I sat down at my computer to work on my blog and found all sorts of good news awaiting me - I had won a prize at the Link Up for Pink blog party, I had been given the Liebster award by Shabby Jo Designs (SQUEEE!!!), and I have been accepted as a Design Team member over at Tuesday Alchemy!  Woohoo, I hit the trifecta - does it get any better than that?? 

I am completely and utterly honored that Shabby Jo Designs saw fit to give me this wonderful Liebster Award!!!  Thank you so much for this huge boost of confidence!  You've made my day for days and days!!


ABOUT THE AWARD


Liebster is a German word meaning "Beloved," "Favorite," or "Dearest." This award is a peer to peer award in which fellow bloggers present the award to their favorite bloggers with fewer than 200 followers. The origins of this award is unclear, but is believed to have originated by a German blogger. This award was designed to be a blog award in the pay it forward fashion to share your dearest and most beloved blogs that have fewer than 200 followers.

RULES FOR ACCEPTANCE
- Thank the person who gave you the award and link back to their blog. 
- Post the award onto your blog. 
- Give the award to five bloggers who you appreciate that have fewer than 200 followers. 
- Leave a comment on their blog letting them know that you have given them this awesome award!

This will be difficult as I follow many wonderful and inspiring blogs, but here are the standouts:


Lynn was the very first person to welcome me as a brand new poster over at Splitcoaststampers a couple of months ago, and she has given so much encouragement and inspiration that this is how I would like to thank her, not to mention she makes fabulous cards.  You MUST check out her three-part stamped cards using Kitchen Sink Stamps.  I've never seen anything like these stamped images - they look so realistic, almost like photographs!  So please stop by and visit her blog and be inspired as I have been!

Lee-Anne at Creatively LA

Lee-Anne is another fellow Splitcoaststamper who designs the most lovely and diverse cards.   I am consistently amazed at the creativity she displays and have found myself on several occasions putting her cards in my Favorites folder so that I may pull inspiration from them at a later date.  Plus, she has a great sense of humor.  Pop on over for a visit!!

Laine at Dream Laine

If you like highly embellished cards, you will LOVE the ones that Laine creates.  WOW!!! I could lose myself in her blog for hours, it is that much eye candy.  Those are the kinds of cards I, as a relative newcomer to papercrafting, aspire to make.  Her blog contains interesting stories of her other hobbies as well, which makes for pleasant reading.  By all means pay her a visit - you won't be sorry!


Cheryl is one of those gifted paper artists with a fantastic gift of coloring and color coordination.  That is to say her cards are STUNNING.  Check out her Girl On Fire card and you will see what I mean.  Plus, her blog is just flat out interesting to read, too. Hop on over there to check her out - you will LOVE her site!

Heather at Creative Blessings

Heather is a fellow stamper over at StampNation and I have admired her cards for as long as I've known her.  They look like something I would buy in a store.  I don't do CAS cards very well because I like a lot of "stuff" on my cards, but she makes even the most CAS cards exciting with textures and patterns, and I have put many of her cards in my Favorites folder.  Whiz on over to visit her and you will see what I mean - BEAUTIFUL cards!!

Well that's it for me.  Please be sure and visit all of these wonderful ladies and their blogs, and don't forget to leave a little love for them.  

And thank you again, Shabby Jo, for thinking of me!!

That's it for me today, but I'll be back tomorrow with another new card.  Until then,

Happy Crafting!!


Friday, October 19, 2012

Snowy Friends

Hi and good morning!

Today's card is more wishful thinking for me.  I posted last week that I love winter, including snow and all that that entails.  As I sit here in mid-October in shorts and a t-shirt, I'm dreaming of a white Christmas indeed.  We had one 3 years ago, or was it 4?  It was BEAUTIFUL and so picture perfect; however, while I and my house guests enjoyed that wonderful white stuff, my poor temperate-zone plants did not, and I nearly lost some of my favorite evergreens, the sweet olives that bloom faithfully at least three times a year with the most heavenly lemon/vanilla scent you can imagine.  It took them a full year to recover, but they did, and we've not had much snow since.  Just a couple of inches each year, in fact, and no severe hard freezes either.  But I can still wish and dream, right?


I stamped the image in Tuxedo Black, using Flourishes Warm Winter Wishes on Whisper White CS, and colored it mostly with Copics and a few watercolor pencils and a blender pen (the carrot nose and tree branch arms).  I chalked around the image with two shades of blue .  The doily behind was die cut with Dienamics Dizzy Doily after first applying Perfect Pearls in "Pearl" to the CS.  I also used Perfect Pearls to add the snowflakes to the Pacific Point base layer as it looked a little plain without it.  The yellow strip is SU Daffodil Delight DSP Stack.


The blue mitten is from the same stamp set and was colored with Copics with dashes of Gelly Roll sparkle pens and Aleene's Paper Glaze on the heart.

The snowman's eyes are two tiny black rhinestones and his buttons are SU Antique Trinkets.  I used a MS border punch for the snowflake border, some snowflake ribbon from the craft store, and a SB Ribbon Banner in Daffodil Delight, using a greeting from the Flourishes Christmas Classics stamp set and adhering two blue rhinestones and then popped it up on SU Dimensionals.

Thank you for joining me, and I hope you have the winter of your dreams, white or otherwise.

Happy Crafting!!

I am entering this card in the following challenges:

Flourishes Timeless Tuesday #191 - Winter theme
Anything Goes Challenge #78 - Make Your Own Embellishments
Color Throwdown #214
CCEE#1242 - Snowman
Red Carpet Studio RCS#7 - "The Birds"
Creative Card Crew Challenge #21 - Birds
and last but not least,
The Craft's Meow October Sketch Challenge


Thursday, October 18, 2012

Sweet Treats!

Hello!

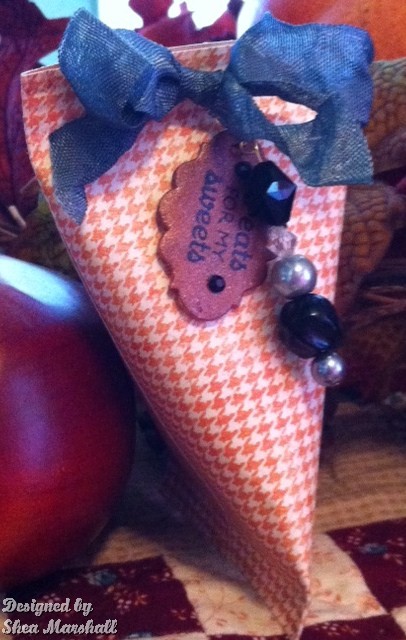
Today's card isn't a card at all - they are little sweet treat containers for Halloween.  These are called several things, but I know them as "sour cream containers."  Aren't they just darlin'?


I learned how to make them on StampNation, a website filled with tutorials on all manner of paper crafting techniques.  Members click here, non-members click here.  The papers for the first two are SU DSP Stacks (Pumpkin Pie and Basic Grey) and Authentique Enchanted Series for the third.  I stamped the PP paper with script and bat stamps in brown and black ink respectively as I felt the paper needed a little more Halloween interest.

The tags are my latest embellishment obsession, Shrinky Dinks.  I punched them using SB Nesties Labels 20.  The tiny one (smallest Nestie) was sponged with Pumpkin Pie before shrinking and the larger two (next to smallest Nestie) were painted with Creative Inspirations paints after.  I didn't have any orange, so for one of them I painted with several alternating layers of Canary and Tickled Pink, and for the other one I alternated layers of Copper and Chocolate.  They glimmer depending on how the light hits them.  I stamped the larger two with Staz-On and the tiny one with glue and then applied glitter.  The glitter doesn't stay on well, though, so I don't really recommend that application.  All stamps were from the Flourishes Witching You a Happy Halloween stamp set.

 I made the jewelry charms with beads, pearls and findings that I had on hand. I hand dyed the seam binding SU Concord Crush and Memento Tuxedo Black.  A couple of rhinestones for each tag and voila, cute little treat holders!

The hardest part was getting them to stay propped up long enough to have their picture taken.  Had to go all over the house for that part!

I hope you've enjoyed my departure from the norm today - these were so much fun I'll be making some for Christmas.  And maybe more for Halloween, too.  I wound up going to Hobby Lobby today and bought more papers and beads and haven't yet cleaned the craft table of the jewelry making materials.  Making one's own embellishments is that much fun.

Happy Crafting!!

   
The challenges I am entering these into are:

Anything Goes Challenge 78 - Make Your Own Embellishments 
There She Goes TSG177 - Fall Fun (Halloween/Fall Theme)
Crazy4Challenges C4C158 - Sweet Treats! 
Really Reasonable Ribbon RRR#58 - Halloween and Ribbon
Creative Inspirations - Halloween Treats
FOSTV #42 - Anything But a Card


Wednesday, October 17, 2012

Pumpkins and spiders...

...and ghosts, oh my!!

OK, only pumpkins and spiders today.  Ghosts later.  

Let me introduce you to "Fred." 


Isn't he a beauty?  I bought Fred at Joanne's last year and could barely stand to touch him, let alone take him home with me.  You see, I am deathly afraid of spiders.  I'm not afraid of much else, but spiders send me running, and I can't even touch a picture of one, much less the real thing.  Hey, we all have something that bothers us, and mine is spiders.  (And scorpions, but that's another story.)  So back to Fred.  Last year was the first year I had time to decorate for fall/Halloween as I had just retired from my outside job, and I wanted to do something fun and different.  I discovered Fred looming in Halloween aisle and gingerly carted him up front.  As I stood at the checkout counter waiting to pay (and daydreaming about the rest of the day), it occurred to me that the checkout kid was holding things up.  When I looked at him, then Fred, then back at him as if to say "Aren't you going to bag him up," he looked at ME and said...

"I'm not touching that thing."  

Anyhoo, Fred now resides over my door for Halloween.  The trick-or-treaters LOVED him last year and I expect they will this year, too.  At night, he looks like this (with the help of a strategically-placed solar lamp).
 

 Today's card is in keeping with the Halloween spirit.  And spiders. 

It is going to be entered in a few challenges, listed below.  All paper, with the exception of the orange/white panel behind the main image, is SU.  That panel is Authentique's Enchanted 6x6 pack.  The image was stamped with SU Greeting Card Kids and From the Garden by Flourishes  (tufts of grass) and colored with Copics (little girl) and watercolor pencils (pumpkin).  


The brown striped layer was first embossed with SU Spider Web embossing folder and then a white pigment ink pad was swiped over the top to enhance the webbing.  The web at the upper left corner is Memory Box Creepy Web, die cut from brown CS and then lightly brushed with Creative Inspirations paint in Copper.


One of the challenges is to make one's own embellishments, which I love doing.  I folded two bits of the same ribbon which are under the main image  (orange grosgrain and vintage peach velvet) and attached a Shrinky Dink pumpkin ornament to it.  I absolutely love using SD for making ornaments and charms.  They make the perfect size embellishment, and they let me be a little kid again.


Thank you for visiting with me today, and until next time, Happy Crafting!!

Challenges entered:

SCS Color Challenge  - Vanilla Chocolate Pie (Very Vanilla, Chocolate Chip,  Pumpkin Pie)
Oozak Challenge #7 - die cuts
Anything Goes - Make Your Own Embellishments
Simon Says Stamp Challenge - Dies and/or Punches
Really Reasonable Ribbon - Challenge #58, Halloween and ribbon/trim
There She Goes - TSG#177 Fall Fun (Autumn or Halloween theme)
and last but not least, 
Sweet Stop Sketch Challenge