Followers

Click on photos to enlarge.

Friday, August 29, 2014

To do baby things or not...that is the question

Hello!

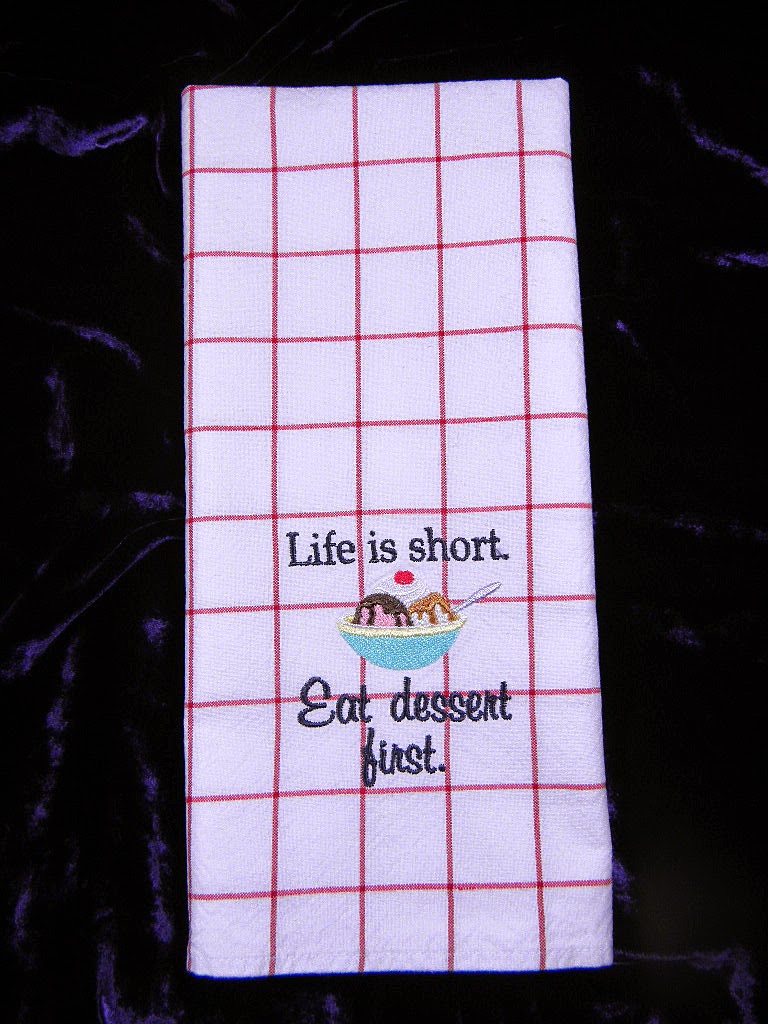
In my last post I stated that I was trying my hand at embroidering various items, i.e. guest and kitchen towels, key fobs and baby things to name a few.  Well...I think I've decided that embroidering baby items is just not my cup of tea.  Maybe it's the tininess of the design area (is "tininess" a real word?  Maybe "tiny-ness?"), or maybe it's because I don't even know anyone having babies for whom to make the samples, or maybe...

No, it's because of the tinyness of the designs and how frustrating it was for me to hoop the onesies.  That's not to say I didn't do a few, because I did.  Four sets for a girl in my husband's office who will be going on maternity leave soon, to be exact.  Four different styles ranging from cutesy to artsy to cool to sweet.  They turned out well, I learned some things (how to hoop a tiny 3" square area for starters), but I also learned that not every kind of embroidery is going to be fun for me.

This was the cutesy set, a bib and a burp cloth made from a fingertip towel. Applique design from Embroidery Library.

An appliqued bunny and the baby's name
The "cool" set. Design from Urban Threads.


See that little butterfly?  It wasn't part of the main design.  On the bib it was just a decoration to match the one on the onesie.  I learned what the wrong needle can do to knits - it can tear a thread and start a run exactly like on a pair of nylon stockings.  The butterfly fixed it and actually made the design look cuter anyway.  Win win!

The artsy set.  The image is from Urban Threads.


I've recently discovered the Urban Threads website which is filled with all manner of fun embroidery designs including punk, gothic, artsy and more.  Not a lot of cutesy there, but there are plenty of other sites for that.

I had fun practicing different ways of personalizing these designs with different font and letter layouts.

The sweet set.  Design from Embroidery Library.

Embroidery Library was the first website I discovered back when I first started embroidering. They have many beautiful, fun, sweet and cutesy designs not to mention lots and lots of project tutorials and tips on the various aspects involved in this wonderful craft.  It truly is one-stop shopping and learning at Embroidery Library.

And there you have it - my foray into the world of embroidering for baby.  I won't add it to my business plan, but at least I can give new moms and moms-to-be a nice, personalized gift.  Thankfully I only bought a dozen of each item and not dozenS (which is my natural tendency).

Thanks for joining me today, and I wish you a lovely holiday weekend for the Americans out there and a lovely weekend in general for the rest!

Happy crafting!


Wednesday, August 27, 2014

New Directions!

Hello and Happy (almost) Fall, Y'all!

Did you take a vacation this summer?  I did (from blogging) and am back with vim and vigor.  And a new (old) craft!  Since completely redoing my craft room (you can see the befores and afters here), I've been itching to fire up my Viking and get back to embroidering.  I had only been doing it about a year before discovering fun with paper and glitter, but I couldn't do both the way my craft room was situated before - it was either one or the other - but now I can do either one on a whim by just rolling my chair to either side of the room.  Yay!


Here's my darling embroidery machine.  It's a Viking Designer Diamond, and I just love it.  The software, which I upgraded a couple of weeks ago (so many changes happened in the past two years that I sort of HAD to, right?) allows it to do just about everything but wash dishes for me.  As I hadn't embroidered anything in two years, it was all pretty new again and took a bit of learning to figure things out and remember what I had forgotten, but it's been time well spent.  This time around I plan to really dig deep into all of the options and features available because I want to expand the embroidery business much more than what I'm doing now, which is basically towels, both guest and kitchen, plus a few baby things.  And key fobs - they are so FUN!  I want to do it all right now, but learning is a process.  Baby steps...

Here are a few of my projects and I will share more in the coming days and weeks as I grow this hobby.  At the moment I'm putting most everything I make into the Etsy shop (saving a few for gifts) and I've just barely dipped my toes into the waters of personalizing and customizing.  Eeek!

For a fall wedding or bridal shower.


Meow...Halloween is coming.
 
Suzani Hearts for just because.


Happy candy corn!


My sentiments exactly.

And these are just a tiny few of what I've been up to for the past couple of months, my "beginner" projects as it were.  Next I'm digging through my closet and drawers for clothes (t-shirts and cotton shirts) on which to practice clothing-type embroidery.

Thanks for joining me (it's good to be back!) and I wish you a wonderfully crafty day!

Happy crafting!

Oh wait, just one more...

My darling crafting companion loves the room too.  She thinks it might produce a handmade winter coat soon.  She could be right.
All embroidered items are for sale in my Etsy shop.

Tuesday, July 1, 2014

The Good, The Bad and The Ugly revisited

Hello!

Today I'd like to show you a couple more stick pins that I made last week that will be put in the Etsy shop.  These are whoppers, a good 5" long, and would make a lovely statement on a hat (surprise!), a lamp with a fabric shade, holding a shawl closed, or in various other applications.


See what I mean?  They're LONG.  Now before you say "and they're bent, too," actually they're not.  I moved the lights this way and that, but the appearance of a bent pin is strictly an optical illusion.  Darned lights.  These babies are as straight as an arrow.  A good one.


Got the lights right on this one.  Go figure.  Maybe because it's gold and photographs differently than the silver one...

OK, these were the "good" of my blog title.  Now for the bad...


And the ugly... (come on, you know what's coming.)


What I want to know is, how on earth did she get it all out of the waste bin without tipping it over?  That takes a special talent.  And I don't care what dog experts say, some dogs just KNOW when they've been a baaaad dawg.  This earned her a trip outside for a time out.  (Yes, she was forgiven - how could that face not be?)

Thank you for joining me, and I wish you a day full of cuteness, guilt-ridden or not.

Hugs!

Both stick pins are available in my Etsy shop here and here.

Monday, June 30, 2014

Birthday Greetings

Hello!

Today's card is a birthday card for my mother-in-law whose birthday is this coming Saturday.  My husband gave me carte blanche, which delighted me because she and I have very similar tastes.  This was a fun one for me.


I started with a kraft base and layered patterned paper with a red mat.  The music is vintage from when I first learned to play the piano a zillion years ago (or so it seems), and I've distress inked the edges of all the papers.


The greeting is by Inspired by Inspired by Stamping and the shape was cut on my Silhouette Cameo as was the shadow mat.

The lace trim has been topped with some large flat back pearls I had in my stash.

The triple loop bow is lovely seam binding from Really Reasonable Ribbon and has been adorned with one of my little handmade charms for an added dose of cute.  

A leafy flourish in one corner and some red stitching (red is her and my favorite color) and the front was finished.

The inside has contrasting card stock and some birthday-inspired stamping.  I hope she enjoys it and has lots of cake.  I might have some too to honor her.

Thank you for joining me, and here's wishing you a lovely week ahead!

Happy crafting!


Saturday, June 28, 2014

Blue Birthday

Hello!

Today's card is for a guy.  No one in particular, it's going in my Etsy shop which has a shortage of cards suitable for men.  As usual, I had a rather tough time with it.  I hope to do more so that there's a selection from which to choose but also so that I'll get more comfortable doing them.  Because guys deserve nice cards too, right?


This one is done in shades of teal and brown and features distressed edges, distress inking, a curled corner and a wonderful background stamp heat embossed in gold onto the teal base layer.  (It's by Flourishes but is no longer carried in their shop.)  


The sentiment tag has inked edges, gold embossed edges and sponging in the center for a halo effect.  Gold eyelets have twine threaded through them and the whole unit is topped with a few tiny gears and then layered over a bit of distressed netting.

The inside, as always, is kept simple with layers of contrasting card stock and inked edges.

Thank you for joining me and I wish you a fantastic, crafty weekend!

Happy crafting!


Friday, June 27, 2014

Merci Beaucoup

Hello!

"Merci Beaucoup..."  That's what today's card says in a most elegant font.  This was a commission through my Etsy shop by a lady who loves pink and purple and wanted "elegant and ladylike," a style which is dear to my heart.  I don't work with a lot of purples, so this was a fun challenge.

Let me say right now that this is a tad more vivid than it is in real life.  The purple of the base cardstock and handmade stick pin is not "in your face" as these are here, but I don't know what is happening, so you'll need to get the gist of the card.  At least the other colors are showing true.

I've dry embossed the base layer then heat embossed the edges with gold  Then I followed a sketch and added the patterned papers, matting them with contrasting card stock and stitching as I went along.  I love stitching on paper - it adds so much personality and character to a card.


The greeting is stamped on white paper then die cut with a lacy rectangular die.  If you've followed my work at all you'll know that I just don't DO white, either the color or wide open spaces, and this piece, small as it was, was no exception.  It was so...WHITE.  So I added the pearls to the corners and then added clear Stickles to all of the flourishes which shows a little bit here.  The sparkle in real life is subdued (this is a ladylike card, after all), but it's still there to diminish all that white a bit.  Phew.

The bow is where I had the most fun.  I LOVE bows.  I don't know why as I hated wearing them as a child (just ask my mother), but they seem to belong on cards as much as possible, and this one was no exception.  I used a delicious 1" wide silk ribbon to make a luscious double bow and adhered a small lace rosette behind it, then finished it off with one of my handmade stick pins which I thought was the perfect jewelry for this card.

The inside was finished simply with contrasting card stock and a small stamped greeting, the English version of what's on the front.  Just in case.

Merci beaucoup for joining me and I wish you a lovely day full of summery delights.

Happy crafting!


Wednesday, June 25, 2014

Life in Your Years

Hello!

Today I'm featuring a card that I've made for my former boss whose birthday is fast approaching.  I've used another of my favorite famous-person quotes, this time one by Abraham Lincoln.

Because THAT is the truth.  Make those years count.


I first embossed the words in black on white card stock and then sponged various shades of yellow, orange and red on top.  I barely inked the edges in black to make the oval stand out from the orange mat behind it, then adhered them both to the black background which I first dry embossed in stripes and then wiped a gold metallic ink pad over it for a bit of depth and character.  That layer has an orange mat under it as well for continuity.

I added gold eyelets (grommets?) to the corners and then a teal flourish as the final ornamentation, the same as the teal card base.  I tried my best to add some sort of textile, say black ribbon, but the card wasn't asking for it.  My former boss is a conservative man, so I kept the embellishments to a minimum preferring instead to use the vibrant colors as the main attraction.  And that quote, of course.

The inside was kept simple with contrasting card stock and the simple urge to "Celebrate."  I hope he does.  He works hard and deserves lots and lots of cake.  I had already written my greeting to him when I took the photo so had to photoshop it out.  The paper isn't smudged, I promise.

Thanks for joining me and I wish you all a lovely day!

Happy crafting!


Monday, June 23, 2014

Pins and Bling


Hello!

Today's post is about one of my favorite crafts, that of making blingy stick pins.  Stick pins, also known as hat pins (though who wears them that way any more?), are a wonderful accessory with so many uses.  They can adorn cards, scrapbook pages, tags, altered art, hats, handbags, scarves...you name it, a stick pin can probably embellish it.  Here are a few examples of past stick pins I have made and the cards they dressed up.  This one was from March 2013

I started making them a couple of years ago and use them from time to time on my own cards, but now my daughter and I have both decided to start adding them to our Etsy inventory so that others may share in the blingy goodness.

See how prettily they can dress up a card?  They add that little extra pizzazz and I think of them as "card jewelry.  This one was made in July 2013 and I've added a little charm to it.

http://glitterandbonbons.blogspot.com/search?updated-max=2013-07-15T17:15:00-05:00

This one was also made last March, only I didn't use a stick pin, I used one of my little handmade jeweled charms, the two of which I often make together.  


 So here are the ones I made this weekend.  I hope they find good homes.

 Pretty greens and teals.

Blues in the shades of varying ocean depths.

Can't go wrong with pink and light blue.

And some guardian angel charms for good measure.

Thanks for joining me today and I wish you a lovely week full of blingy, charmy goodness!

Happy crafting!


These pins and charms are all for sale in my Etsy shop, as are many more!

(The cards in the photos are for illustration purposes only and are not for sale.)