Hello and good morning!
Just a quick note to give credit where credit's due. On my "Hog Wild" post a couple of days ago I shared a tip on how to use a straight border on a curved shape but couldn't remember where I had learned how to do it. I received a lovely comment from Susan Flynn at Craftin' Suzie and she told me that Debby Yates over at A Scrapjourney uses this technique quite a bit. Sure enough, that's where I had learned it, and I would like to give her full credit for my now knowing a very useful technique. I have since put her into my faves folder, and the bonus here is that I now know about Susan's site and can enjoy her lovely work as well.
Please go visit both ladies and be wowed by their talent and lovely creations.
Thanks for steering me in the right direction, Susan!
Happy crafting!
Shea
Thursday, January 31, 2013
Wednesday, January 30, 2013
Digidarla New DT Member - First Card!
Hello!!
Today marks my official first day as a new Design Team Member over at the wonderfully fun Digi Darla's Challenge blog. Their challenges are always so much fun as the Design Team has a very creative bent, and I know you will enjoy playing along. I know I did. And DO!

My card today follows this week's challenge theme, which is "Winter Blues," and that just means to use a lot of blue in whatever way you choose.
 This little old lady yakking on her cell phone makes me laugh and I know I'll be using her again. I colored her in Copics and used a sparkle pen on her eyeglasses and the decoration on her coffee mug.

I made a messy bow out of seam binding and adhered a white crochet flower to it after first inking it up, then I applied a button and some baker's twine on top.
The stitching was a very detailed heirloom stitch from my embroidery machine, which I think added more dimension to the layer. I have to say that it took AGES to stitch, probably about 20 minutes for the whole thing, but I like the effect it gives.
A thin ribbon and label tag finish this simple, yet fun card.
Thank you very much for joining me, and now I hope you'll head on over to Digi Darla's to see what the rest of the lovely Design Team have cooked up for you. And please do play along - we'd love to see you.
Happy crafting!
 Supplies:
Stamps: Coffee (Digi Darla's); Clearly Sentimental About Coffee (MFT)
Ink: Memento Tuxedo Black; Baja Breeze (SU)
Paper: Whisper White, Baja Breeze, Just Add Cake DSP (all SU)
Extras: seam binding, crochet flower (SU), button, baker's twine, SB Grommet Tags, Classic Ovals Large and Floral Ovals dies; 1/8" satin ribbon; sewing machine, Copics, Gelly Roll sparkle pens
Challenges Entered:
Simon Says Stamp and Show - Seeing Stars (the tiny little star on the mug, but more importantly my seam binding which I use on at least 80% of my cards - I LOVE it!)
Love To Create #50 - Anything Goes w/a Sentiment [add GDT after name]
Tammy's Scrapin' Corner #47 - Buttons
Creative Inspirations - Anything Goes
Today marks my official first day as a new Design Team Member over at the wonderfully fun Digi Darla's Challenge blog. Their challenges are always so much fun as the Design Team has a very creative bent, and I know you will enjoy playing along. I know I did. And DO!
My card today follows this week's challenge theme, which is "Winter Blues," and that just means to use a lot of blue in whatever way you choose.


I made a messy bow out of seam binding and adhered a white crochet flower to it after first inking it up, then I applied a button and some baker's twine on top.
The stitching was a very detailed heirloom stitch from my embroidery machine, which I think added more dimension to the layer. I have to say that it took AGES to stitch, probably about 20 minutes for the whole thing, but I like the effect it gives.
A thin ribbon and label tag finish this simple, yet fun card.
Thank you very much for joining me, and now I hope you'll head on over to Digi Darla's to see what the rest of the lovely Design Team have cooked up for you. And please do play along - we'd love to see you.
Happy crafting!

Stamps: Coffee (Digi Darla's); Clearly Sentimental About Coffee (MFT)
Ink: Memento Tuxedo Black; Baja Breeze (SU)
Paper: Whisper White, Baja Breeze, Just Add Cake DSP (all SU)
Extras: seam binding, crochet flower (SU), button, baker's twine, SB Grommet Tags, Classic Ovals Large and Floral Ovals dies; 1/8" satin ribbon; sewing machine, Copics, Gelly Roll sparkle pens
Challenges Entered:
Simon Says Stamp and Show - Seeing Stars (the tiny little star on the mug, but more importantly my seam binding which I use on at least 80% of my cards - I LOVE it!)
Love To Create #50 - Anything Goes w/a Sentiment [add GDT after name]
Tammy's Scrapin' Corner #47 - Buttons
Creative Inspirations - Anything Goes
Tuesday, January 29, 2013
Hog Wild for a Challenge at Tuesday Alchemy
Hello!
Today is Challenge #49 at Tuesday Alchemy, and the theme these next two weeks is Anything Goes! Woohoo! Time to let your creativity loose and create something, ANYTHING!

There are some fab prizes from these very generous sponsors:
And don't forget Tuesday Alchemy challenges now run two weeks, so you have until Feb. 11 to get your entry in.
My card today features a fun stamp from Robyn's Fetish called Hog Wild Over You, which you can find here.

Aren't the happy couple a hoot? And aren't they PINK??? Good grief, I went through several images and combinations of Copics trying to find the right color blend. Think I'm kidding? Here's what they looked like when I finally settled on this one.
 And I promise they're not quite as pink in real life, though it's clear I still need to get some skin-toned Copics. Eeek!

I created both patterned papers, embossing a music stamp on one and creating multicolor polka dots with the eraser end of a new pencil on the other. I placed a flurry of hearts with some ribbon bits and rhinestones for interest.
And here's a FABULOUS trick I learned from one of the blogs I follow, but I'm horrified that I don't remember which one. I will do some sleuthing and search her out so that I may give her proper credit, but in the meantime, this is one of the neatest tricks EVER, and that is how to make a circular or oval lacy border with a straight border punch. Yes, I said straight. You punch a straight piece, snip between the decorative units (but don't cut all the way!), and voila, a curvy border! Is that not the coolest thing ever?? And if you didn't punch a long enough section, it's easy to add in an extra unit or two (see bottom of shape).
Note: If anyone knows who the blogger is who does this regularly, please let me know! Thanks!

Here's a picture of the inside.

And that, dear readers, is today's card. Don't forget to head on over to Tuesday Alchemy to see what's what and enter our challenge. We'd love to see you!
Until next time, here's wishing you a lovely day. Happy Crafting!

Supplies:
Stamp: Hog Wild Over You (Robyn's Fetish), music stamp (unknown origina)
Ink: computer, Memento Tuxedo Black, Regal Rose
Paper: Whisper White, Basi Black, Real Red (All SU)
Extras: new pencil (eraser), Swiss Dots ef, MS punch, rhinestones, Copics, Gelly Roll glitter pens (red), Dienamics Oval Stax; SB Ribbon Banners, black ep, Fashionable Hearts Embosslits (SU).
Challenges Entered:
ALOTA Rubber Stamps #99 - Make your own background
The Pink Elephant TPE184 - Hearts
Love to Create #50 - Anything Goes with a Sentiment
Really Reasonable Ribbon #64 - Valentine's Day/Love & Ribbon
Delightful Challenges - Thinking of You
Crafty Ribbons #37 - Love/Romance/Anniversary
C.R.A.F.T. Challenge #191 - Valentine's Day or Love
Frosted Designs - Music!
Creative Inspirations - Anything Goes
Friday Sketch Challenge #35

Today is Challenge #49 at Tuesday Alchemy, and the theme these next two weeks is Anything Goes! Woohoo! Time to let your creativity loose and create something, ANYTHING!
There are some fab prizes from these very generous sponsors:
| $10 Store Voucher |
 |
| 5 Digital Images |
My card today features a fun stamp from Robyn's Fetish called Hog Wild Over You, which you can find here.

Aren't the happy couple a hoot? And aren't they PINK??? Good grief, I went through several images and combinations of Copics trying to find the right color blend. Think I'm kidding? Here's what they looked like when I finally settled on this one.


I created both patterned papers, embossing a music stamp on one and creating multicolor polka dots with the eraser end of a new pencil on the other. I placed a flurry of hearts with some ribbon bits and rhinestones for interest.
And here's a FABULOUS trick I learned from one of the blogs I follow, but I'm horrified that I don't remember which one. I will do some sleuthing and search her out so that I may give her proper credit, but in the meantime, this is one of the neatest tricks EVER, and that is how to make a circular or oval lacy border with a straight border punch. Yes, I said straight. You punch a straight piece, snip between the decorative units (but don't cut all the way!), and voila, a curvy border! Is that not the coolest thing ever?? And if you didn't punch a long enough section, it's easy to add in an extra unit or two (see bottom of shape).
Note: If anyone knows who the blogger is who does this regularly, please let me know! Thanks!


And that, dear readers, is today's card. Don't forget to head on over to Tuesday Alchemy to see what's what and enter our challenge. We'd love to see you!
Until next time, here's wishing you a lovely day. Happy Crafting!

Supplies:
Stamp: Hog Wild Over You (Robyn's Fetish), music stamp (unknown origina)
Ink: computer, Memento Tuxedo Black, Regal Rose
Paper: Whisper White, Basi Black, Real Red (All SU)
Extras: new pencil (eraser), Swiss Dots ef, MS punch, rhinestones, Copics, Gelly Roll glitter pens (red), Dienamics Oval Stax; SB Ribbon Banners, black ep, Fashionable Hearts Embosslits (SU).
Challenges Entered:
ALOTA Rubber Stamps #99 - Make your own background
The Pink Elephant TPE184 - Hearts
Love to Create #50 - Anything Goes with a Sentiment
Really Reasonable Ribbon #64 - Valentine's Day/Love & Ribbon
Delightful Challenges - Thinking of You
Crafty Ribbons #37 - Love/Romance/Anniversary
C.R.A.F.T. Challenge #191 - Valentine's Day or Love
Frosted Designs - Music!
Creative Inspirations - Anything Goes
Friday Sketch Challenge #35
Monday, January 28, 2013
Digi Darla Newest DT Member!
Hello and good morning!
Just a quick note this morning to say that I've been accepted as one of the new Design Team members of the wonderful and FUN challenge site, Digi Darla's Challenges! Woohoo!
I am so excited to be a part of their fabulous team and am working on an upcoming project even as we speak (or as I write), so no card today, but do stay tuned! However, please go there right now and join their latest challenge, DDC#47, which is all about "Winter Blues" and also to see what the lovely designers have in store for you as inspiration.

See you there, and happy crafting!
Just a quick note this morning to say that I've been accepted as one of the new Design Team members of the wonderful and FUN challenge site, Digi Darla's Challenges! Woohoo!
I am so excited to be a part of their fabulous team and am working on an upcoming project even as we speak (or as I write), so no card today, but do stay tuned! However, please go there right now and join their latest challenge, DDC#47, which is all about "Winter Blues" and also to see what the lovely designers have in store for you as inspiration.
See you there, and happy crafting!
Saturday, January 26, 2013
A Gem of a Challenge - Holidays!
Today is my first post as one of the new DT members for A Gem of a Challenge, and I am tickled half to death to be here! The prize for the lucky winner will be 2 Individual Digi images of the winner's choice from PINK GEM DESIGNS (Subject to Availability).....

Our challenge this week, as chosen by Donna, is Holidays, which can mean any holiday of the year, and you have until 6:00 pm Feb. 1 to enter.
I chose Easter. The stamp is "Easter Chicks," which you can find here, and I have colored them with Copics.


I've colored their background with chalks, using a scallop circle die cut as a mask for the clouds. The two background papers were made using the emboss resist technique with slightly different stamps for each panel.
The flowers are sparkly using Liquid Pearls as their centers. There is the teensiest little rhinestone on the girly chick's bow.

I've used some lavender seam binding for the bow and a button with pearl for the center, plus I added one of my smaller stick pins which I made specifically for this card. A couple of additional pearls complete this little Easter card.
Thank you so much for joining me today, and I appreciate any and all comments. And please do stop by A Gem of a Challenge and play along. We'd love to see you there!
Supplies:
Stamps: Easter Chicks (Pink Gem Designs); Tiny Tags (SU)
Ink: Perfect Plum, Regal Rose (SU), Versamark
Paper: Whisper White, Pretty in Pink
Extras: Clear ep, Copics, seam binding (3 Girl JAM), button, pearls, MS border punch, Edgelits Adorning Accents (SU), SB Lattice Rectangles die, Gelly Roll sparkle pens, Liquid Pearls, chalks.
Challenges entered:
ALOTA99 - Make your own background
Incy Wincy Designs - Make Us Laugh (I do every time I see the little chick with the shell on his head)
Tuesday Throwdown #131 - Furry Animals (does "fuzzy" count? They're still soft to touch!)
Simon Says Stamp and Show - What are you known for? (Using ribbon and my custom-made pins.)
Thursday, January 24, 2013
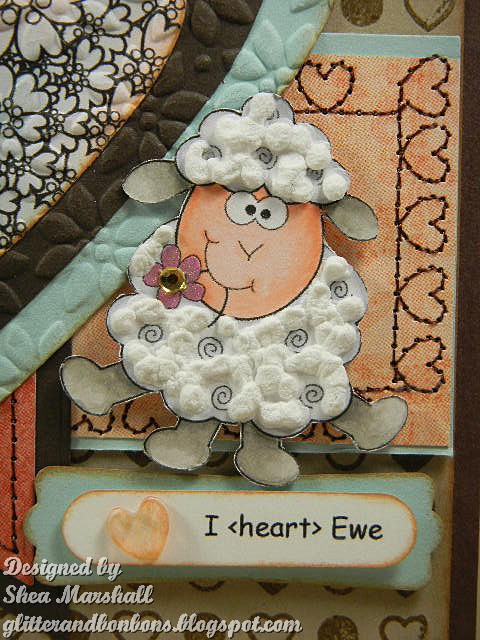
I Heart Ewe (too)
Hello!
Today's card features a couple of stamps from the cute, cute, cute site Pink Gem Designs. The names of the stamps are"Ewe Make Me Smile," and "Flower Heart", though I didn't use the particular sentiment that went with the little lamb as this was for a challenge to make a Valentine card in unusual colors. Brown, aqua and coral, to be more precise. Another challenge is to use hearts, more than one. Gee, do you think there are a few on this card? (All challenges will be listed below.)

I'm still pretty new to working with digital stamps, so what should have been a fairly straightforward card took considerably longer by virtue of the fact that I kept working and re-working sizes and placement on paper. I am going to devote the entire day on Saturday to getting more comfortable with them.

Isn't this little gal a hoot with her fluffy wool? I used Puffies from The Rubber Cafe which, unlike regular puff paint which has to dry before being heated, is heated and puffed immediately upon placement. Instant gratification.
The centerpiece heart, three layers embossed into one, was colored with chalks for a soft, dreamy effect.
I made the background by using a SU letterpress. Needed more hearts, you see.

This is a little crochet rosette that I learned how to make using Liz Weber's lovely and easy tutorial here from over on the IBS blog. Next time I'll use slightly wider ribbon, but it still adds a nice touch of softness to the ribbon arrangement. The little computer-generated heart was colored with Copics then covered with Glossy Accents and cut out to top the vintage button. Some thin ribbon and seam binding finish the "bouquet."
Added some stitching (more hearts!), the sentiment and a small, clear heart colored with Copics, and the card was finished.
Thank you so much for stopping by today. Your comments are much appreciated, and if you ever have any questions on a technique, drop me a line - I'll be happy to answer them!
Have a wonderful day, and happy crafting!
Supplies:
Stamps: Pink Gem Designs
Ink: Tea Dye (DI), Baja Breeze (SU)
Paper: Whisper White, Pool Party, Soft Suede, Crumb Cake (SU); Classic White (Flourishes); Miss Caroline (MME Howdy Doody)
Extras: Framelits Hearts, Letterpress Heart Pressed, Petals- a- Plenty ef, Word Window and Modern Labels punches (all SU); sewing machine, Glossy Accents, Copics, seam binding, thin ribbon, Dienamics Fishtail Stax (MFT), Puffies (The Rubber Cafe), crochet ribbon, vintage button, Prima crystal heart, Gelly Roll glitter pen, rhinestone.
Challenges entered:
ALOTA99 - Make your own background
Simon Says Stamp and Show - What are you known for? (Lots of layers, textures, patterns)
Incy Wincy Designs - Make us laugh
Tammy's Scrapin' Corner #46 - Red and/or Hearts
SCSCC410 - Color Combination - Brown, coral, aqua
SCSF4A153 - Warm Fuzzy Wuzzies
Tuesday Throwdown #131 - Furry Friends
RRR#64 - Valentine's Day/Love and ribbon
City Crafter #143 - Forever Mine (just add hearts)
Crafts and Me #117 - Vintage
Delightful Challenges - Thinking of You
Crafty Ribbons #37 - Love/Romance/Anniversary
C.R.A.F.T. Challenge #191 - Valentine's Day or Love
Sugar Creek Hollow - Tic Tac Toe (flowers, ribbon, sewing)
Pile It On #3 - Have a Heart
Today's card features a couple of stamps from the cute, cute, cute site Pink Gem Designs. The names of the stamps are"Ewe Make Me Smile," and "Flower Heart", though I didn't use the particular sentiment that went with the little lamb as this was for a challenge to make a Valentine card in unusual colors. Brown, aqua and coral, to be more precise. Another challenge is to use hearts, more than one. Gee, do you think there are a few on this card? (All challenges will be listed below.)

I'm still pretty new to working with digital stamps, so what should have been a fairly straightforward card took considerably longer by virtue of the fact that I kept working and re-working sizes and placement on paper. I am going to devote the entire day on Saturday to getting more comfortable with them.
Isn't this little gal a hoot with her fluffy wool? I used Puffies from The Rubber Cafe which, unlike regular puff paint which has to dry before being heated, is heated and puffed immediately upon placement. Instant gratification.
The centerpiece heart, three layers embossed into one, was colored with chalks for a soft, dreamy effect.
I made the background by using a SU letterpress. Needed more hearts, you see.

This is a little crochet rosette that I learned how to make using Liz Weber's lovely and easy tutorial here from over on the IBS blog. Next time I'll use slightly wider ribbon, but it still adds a nice touch of softness to the ribbon arrangement. The little computer-generated heart was colored with Copics then covered with Glossy Accents and cut out to top the vintage button. Some thin ribbon and seam binding finish the "bouquet."
Added some stitching (more hearts!), the sentiment and a small, clear heart colored with Copics, and the card was finished.
Thank you so much for stopping by today. Your comments are much appreciated, and if you ever have any questions on a technique, drop me a line - I'll be happy to answer them!
Have a wonderful day, and happy crafting!
 |
| Showing a bit of the inside. |
Stamps: Pink Gem Designs
Ink: Tea Dye (DI), Baja Breeze (SU)
Paper: Whisper White, Pool Party, Soft Suede, Crumb Cake (SU); Classic White (Flourishes); Miss Caroline (MME Howdy Doody)
Extras: Framelits Hearts, Letterpress Heart Pressed, Petals- a- Plenty ef, Word Window and Modern Labels punches (all SU); sewing machine, Glossy Accents, Copics, seam binding, thin ribbon, Dienamics Fishtail Stax (MFT), Puffies (The Rubber Cafe), crochet ribbon, vintage button, Prima crystal heart, Gelly Roll glitter pen, rhinestone.
Challenges entered:
ALOTA99 - Make your own background
Simon Says Stamp and Show - What are you known for? (Lots of layers, textures, patterns)
Incy Wincy Designs - Make us laugh
Tammy's Scrapin' Corner #46 - Red and/or Hearts
SCSCC410 - Color Combination - Brown, coral, aqua
SCSF4A153 - Warm Fuzzy Wuzzies
Tuesday Throwdown #131 - Furry Friends
RRR#64 - Valentine's Day/Love and ribbon
City Crafter #143 - Forever Mine (just add hearts)
Crafts and Me #117 - Vintage
Delightful Challenges - Thinking of You
Crafty Ribbons #37 - Love/Romance/Anniversary
C.R.A.F.T. Challenge #191 - Valentine's Day or Love
Sugar Creek Hollow - Tic Tac Toe (flowers, ribbon, sewing)
Pile It On #3 - Have a Heart
Wednesday, January 23, 2013
Inspired by Stamping Guest Designer!
Hello!!
Today is an exciting day as I've been asked to be this week's Guest Designer for the ever so lovely challenge blog, Inspired by Stamping Inspiration Challenge (IBSIC).

Each week they offer a different color challenge and wonderfully creative, diverse inspiration samples from their very talented Design Team, and it is huge honor to get to play with them this week!
Today's card is for this week's Challenge #43 and we are to use the colors white, saffron yellow and pink. If you don't have exactly those colors, no worries! Just come as close as possible with what you do have.
 I love these colors, and it seemed only natural to make something romantic with lots of lacy effects, hence my anniversary easel card.


The sentiment and frame stamps have been embossed in gold, plus I've created my own background papers on some of the layers, including stamping on already- printed dp. The large yellow rose was made by me, the little teeny tiny roses are from IBS. Sooo cute!

This little heart is made of wood, which I've painted with several layers of CI paints, Ivory and Tutu Pink. I would have loved to have painted a rose on it, but my painting skills are less than noteworthy, especially when it comes to roses, one of the most difficult of all flowers to paint. I'm going to learn! In the meantime, this is a small sticker which I've sealed with a couple of layers of Mod Podge.
A few loops of various ribbons, including a small piece of crochet ribbon, a few leaves and pearls, and my card is complete.

Thank you for taking time to stop by today, and do try to visit IBSIC to play in their challenge. They would love to have you!
Happy crafting!

Supplies:
Stamps: Vintage Frames, Delicate Doilies, All Year Wishes I, Paris (All IBS)
Ink: Pink Pirouette, So Saffron (SU), Versamark
Paper: Whisper White, Subtles DSP Stack (SU)
Extras: SB Labels Twenty, Labels Eight, Decorative Labels Eight; ribbon, pearls, MS pine branch punch, gold ep (SU), tiny roses (IBS), CI paints, wooden heart, pearl trim, dimensionals.
Challenges entered:
ALOTA99 - Make your own background
TSTR#150 - Make It Pretty (The SU dsp has a wallpaper striped effect, and the yellow rose is made with striped dp.)
Simon Says Stamp and Show - What are you known for? (Lots of layers, flowers, embellishments)
Tammy's Scrapin' Corner #46 - Red and/or hearts
Creative Card Crew #28 - Girly
Crafts and Me #117 - Vintage
Crafty Ribbons Challenge #37 - Love/Romance/Anniversary
Allsorts #190 - Flower Power
Pile It On #3 - Have a Heart
Sugar Creek Hollow - Tic Tac Toe (flowers, pearls, diecut)
City Crafter #143 - Forever Mine
Today is an exciting day as I've been asked to be this week's Guest Designer for the ever so lovely challenge blog, Inspired by Stamping Inspiration Challenge (IBSIC).
Each week they offer a different color challenge and wonderfully creative, diverse inspiration samples from their very talented Design Team, and it is huge honor to get to play with them this week!
Today's card is for this week's Challenge #43 and we are to use the colors white, saffron yellow and pink. If you don't have exactly those colors, no worries! Just come as close as possible with what you do have.

The sentiment and frame stamps have been embossed in gold, plus I've created my own background papers on some of the layers, including stamping on already- printed dp. The large yellow rose was made by me, the little teeny tiny roses are from IBS. Sooo cute!

This little heart is made of wood, which I've painted with several layers of CI paints, Ivory and Tutu Pink. I would have loved to have painted a rose on it, but my painting skills are less than noteworthy, especially when it comes to roses, one of the most difficult of all flowers to paint. I'm going to learn! In the meantime, this is a small sticker which I've sealed with a couple of layers of Mod Podge.
A few loops of various ribbons, including a small piece of crochet ribbon, a few leaves and pearls, and my card is complete.

Thank you for taking time to stop by today, and do try to visit IBSIC to play in their challenge. They would love to have you!
Happy crafting!

Supplies:
Stamps: Vintage Frames, Delicate Doilies, All Year Wishes I, Paris (All IBS)
Ink: Pink Pirouette, So Saffron (SU), Versamark
Paper: Whisper White, Subtles DSP Stack (SU)
Extras: SB Labels Twenty, Labels Eight, Decorative Labels Eight; ribbon, pearls, MS pine branch punch, gold ep (SU), tiny roses (IBS), CI paints, wooden heart, pearl trim, dimensionals.
Challenges entered:
ALOTA99 - Make your own background
TSTR#150 - Make It Pretty (The SU dsp has a wallpaper striped effect, and the yellow rose is made with striped dp.)
Simon Says Stamp and Show - What are you known for? (Lots of layers, flowers, embellishments)
Tammy's Scrapin' Corner #46 - Red and/or hearts
Creative Card Crew #28 - Girly
Crafts and Me #117 - Vintage
Crafty Ribbons Challenge #37 - Love/Romance/Anniversary
Allsorts #190 - Flower Power
Pile It On #3 - Have a Heart
Sugar Creek Hollow - Tic Tac Toe (flowers, pearls, diecut)
City Crafter #143 - Forever Mine
Herringbone Baby (Card)
Hello!
I'm pulling from the archives today as I have been working again on upcoming projects (which I can hardly wait to show you), and today I'm going to show you one of my favorite cards, my Herringbone Baby card. If you've never done the Herringbone Technique before, you SHOULD. It's a great way to use coordinated designer paper, and the end result is quite striking. AND IT'S EASY. You can find the technique here at SCS where Beate Johns has given a fine tutorial. I urge you to try it at least once.

I've kept the image and embellishment simple so as to not cover up the pattern too much. I colored the sweet little image with chalks using a Q-tip and popped it up on two doily dies. Ribbon, a tag, and a tiny clip complete the card.
I hope you'll give this technique a try. You'll get a kick out of the magic that happens when you finish it.
I wish you a lovely day, and happy crafting!
Supplies:
Stamps: unknown bird, Terrific Tags (Fiskars), Hello Baby (Flourishes)
Ink: Memento Rich Cocoa; Garden Green, Real Red (SU)
Paper: Whisper White, scraps
Extras: Dienamics Dainty Doily Duo dies; tiny clothespin, seam binding, chalks
Tuesday, January 22, 2013
Pretty in Purple
Hello and good morning!
Woohoo, I've got my computer back!! It came in last night and I stayed up rather late putting it all back together and updating everything that requires daily input. SO happy to have it back. I told DH that working on my laptop was akin to driving in reverse - I could still get to where I was going, it just took longer and I had to go slower. So now things are back to normal. ("Normal??" What's THAT?)
Today's card is a simple one without a lot of fuss and frill.
 I stamped it in gray rather than black so as to not appear too harsh and colored it with Copics. I stamped a light flourish onto the base layer first so as to give it a little more interest.
 I added the teensiest little pearls to the flower centers on the cup and saucer.
 The rolled roses are made of felt with the larger one using two strands in contrasting colors. I also added a pink flower button and some very light green leaves.

The butterfly has been paper pieced and popped up on a dimensional, and a few more small, though not AS small, pearls have been added to the outside border before also popping the centerpiece up on dimensionals.
And that, lovely readers, is my card for the day.
BTW, did I mention the battery on my phone is going out and I can't send pictures on it anymore? Perhaps it only needs a new battery... *sigh*
At any rate, thank you for stopping by and I wish you a lovely Tuesday.
Happy crafting!
 Supplies:
Stamp: Simple Pleasures (IO), Creative Elements (SU)
Ink: Versafine Smokey Gray
Paper: Whisper White, Wisteria Wonder, Concord Crush, Subtles DSP Stack (all SU)
Extras: Dienamics Leafy Flourish, Mini Rolled Roses, Oval Stax Dies; SB Floral Ovals dies; felt, pearls, flower button, Copics, dimensionals.
Challenges Entered:
ALOTA Rubber Stamps #99 - Make your own background
Divas By Design - Make It Girlie
Creative Card Crew #28 - Make It Girlie
Allsorts #190 - Flower Power
Woohoo, I've got my computer back!! It came in last night and I stayed up rather late putting it all back together and updating everything that requires daily input. SO happy to have it back. I told DH that working on my laptop was akin to driving in reverse - I could still get to where I was going, it just took longer and I had to go slower. So now things are back to normal. ("Normal??" What's THAT?)
Today's card is a simple one without a lot of fuss and frill.


The butterfly has been paper pieced and popped up on a dimensional, and a few more small, though not AS small, pearls have been added to the outside border before also popping the centerpiece up on dimensionals.
And that, lovely readers, is my card for the day.
BTW, did I mention the battery on my phone is going out and I can't send pictures on it anymore? Perhaps it only needs a new battery... *sigh*
At any rate, thank you for stopping by and I wish you a lovely Tuesday.
Happy crafting!

Stamp: Simple Pleasures (IO), Creative Elements (SU)
Ink: Versafine Smokey Gray
Paper: Whisper White, Wisteria Wonder, Concord Crush, Subtles DSP Stack (all SU)
Extras: Dienamics Leafy Flourish, Mini Rolled Roses, Oval Stax Dies; SB Floral Ovals dies; felt, pearls, flower button, Copics, dimensionals.
Challenges Entered:
ALOTA Rubber Stamps #99 - Make your own background
Divas By Design - Make It Girlie
Creative Card Crew #28 - Make It Girlie
Allsorts #190 - Flower Power
Monday, January 21, 2013
Love to Create Guest Designer!
I am so excited today to have been invited to be this week's Guest Designer for the Love to Create Challenge Blog!
I have only recently discovered this fun challenge site as I am relatively new to challenges at all, having only begun my blog last September; however, their challenges are so enjoyable that I try to play along every week. The Design Team is fantastic, and I always enjoy seeing what they've come up with, and that's why I am delighted to get to play with them this week!
This week's theme is "3 Favorite Colors," which for me was a little tricky since I have so many favorites. Red is probably my all time fave in all aspects - wardrobe, wall color, furniture upholstery...(no, my house doesn't look like a bordello, but it DOES have a lot of red in it). But I also love turquoise. And pink. And black. And...the list goes on. Therefore, today's center step card has a big dose of turquoise with rose red and saffron yellow to complement because, while I wouldn't wear yellow per se, I love it and love what it does to other colors - it just warms them right up.


See the different pieces? Put them together...

...and you get this. Can you see the slight shadow the raised pieces make? It looks 3-D indeed. SO much fun if you like fussy cutting (and I do). Now Rose cuts really, REALLY small pieces, but I just did three.
BTW, this was my first time ever to color fur with Copics, and I have to say I'm fairly happy with it. Tutorial by Suzanne Dean here. I used Copics for the coloring. The purple edge to the butterfly is a bit sparkly, and there are the teeniest rhinestones in the centers of the flowers.

The greeting was punched with a ribbon banner die and stenciled in blue chalk which is soft and subtle in real life, although it doesn't show well in the picture. I also chalked around the image. A few rhinestones both on the banner and on the punched butterflies complete the card.
Thank you so much for taking the time to come and visit, and I wish you a fabulous week full of all the crafting fun you can stand. And many thanks again to the fine team at Love to Create!
Happy crafting!!

Stamps: Butterfly Friend (Whimsy Stamps), Banner Wishes (Paper Sweeties)
Ink: Memento Tuxedo Black
Paper: Whisper White, Rose Red, So Saffron, Tempting Turquoise, Brights DSP Stack (all SU); Sweet Fairy (Prima)
Extras: Circle Stax, Decorative Doily (Dienamics); SB Ribbon Banner, chalks, rhinestones, Copics, ribbon (3 Girl JAM), MS butterfly punch, sewing machine, dimensionals, Embosslits Beautiful Wings.
Challenges entered:
Allsorts #190 - Flower Power
Sunday, January 20, 2013
Disaster!
Hello and good morning!
No new card today, I am in the middle of disaster mode as I'm trying to recover material from my main computer and transfer it to my laptop. The big one finally crashed yesterday and, while I'm not flying completely blind, I'm flying with both eyes barely open. Eeek! So hopefully the tech who is coming to get the hard drive today will be able to figure it out by tomorrow and set me to rights.
In the meantime, and if you're looking for some fun challenges, please head over to these:
The challenge this week is Embossing.
And...
The challenge this week is Winter Wonder, using this lovely photo by Gwynn Wasson Designs as inspiration.
Have a lovely day, and happy crafting!
Subscribe to:
Posts (Atom)