Followers

Click on photos to enlarge.

Tuesday, January 28, 2014

Butterfly Collage

Hello!

All I can say is it's about time I get something posted!  I started this canvas collage last week but life conspired against me such that it took a week to complete!  I won't bore you with the details, but things have finally worked out so that I could finish it and share it with you.

Note: Look no further if heavy embellishment causes you hives or claustrophobia, because this piece is LOADED with it.  <smile>


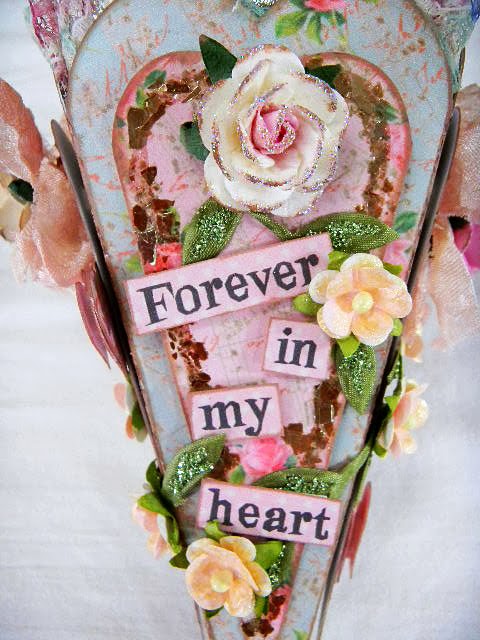
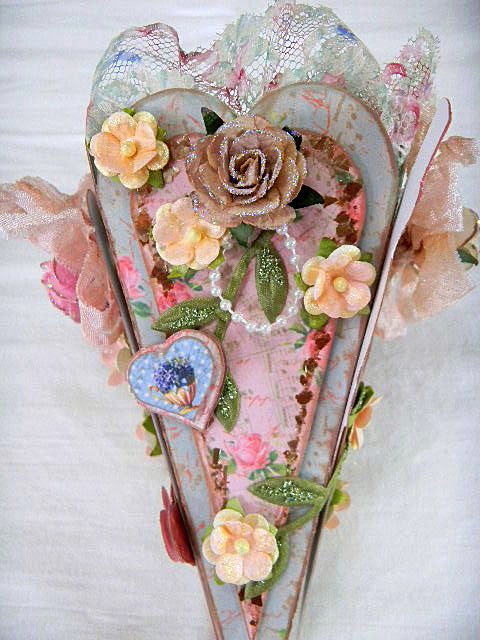
This is a 6x8" canvas board that is chock full of stuff (my favorite kind!) and techniques.  It starts out with a wonderful tissue technique that gives lots of texture and which I painted shades of brown and red and topped with gold Rub 'N' Buff and some lime green paint flicked on as the last step.  Then I decoupaged a piece of vintage style collage paper from Gecko Galz "Dapper Dan" digital paper set and curled up one of the corners.  And last, I placed a strip of beaded, pink leaf-shaped trim up the left side, but most of that has been covered with the various embellishments.  Typical.


I agree, it IS "always tea time."  At least in this household.  Yesterday I had four cups because it was so cold.  Two in the morning, one in the afternoon and one in the evening.  There is no wrong time when it comes to tea.  

The words have been decoupaged after first inking the edges.  Once the decoupage medium was dry I edged them with clear glitter glue.  There is no wrong time for sparkle in one's life, either.


This cute image is what started the whole thing.  It's from the Gecko Galz "Teatime" digital stamp set.  I smile every time I look at it.  I colored it very softly with Copics and distressed the edges, then I adhered it to the back of the Tim Holtz Weathered Clock die cut made from some of his grunge board.  It was inked and brushed with crackle paint, then I applied some gold Rub N Buff with my finger.  Guess what, it doesn't come off with soap and water, so I had two pretty gold "fingahs" for a couple of days.  (Sorry, was channeling a little Shirley Bassey there.)


That little bitty teapot came from my mother's enormous stash of mosaic/crafting supplies in her garage some time ago and it finally found a home here.  See that little bird?  Too sweet!  The large purple flower behind it was made with a purchased rose that I glittered up a bit and which I then placed on three layers of flower petal "blanks" which I airbrushed with various Copic colors.  I needed a bigger flower than that rose.  

Many of the flowers on this piece have been hand colored including the pink-tipped cherry blossoms and some of the roses, though not all.


The ceramic rose is another piece from my mother's "garage stash" and I've applied drops of Glossy Accents to simulate dewdrops.  The dragonfly is a vintage style brooch.

The rose has been attached to a rather rusty, age spotted vintage key escutcheon.  I layered a bit of hand-dyed cheesecloth underneath for a bit of textural difference and placed a beige pearl where the screw once went.  You can see the keyhole in the first and third pictures.


The butterfly was treated the same as the clock.  It started out as grunge board wings which I inked with two colors of distress ink then brushed on a thick coat of crackle glaze and then finger-rubbed some Rub 'N' Buff over that.  I edged the wings with gold glitter glue and adhered a vintage button as the body.  This is propped up and adhered to a resin rose for the 3-D effect. 

The little wooden clock is from Prima and is purely for decoration.


Another garage stash item is the teacup.  It started out white with a Delft windmill which is on the other side, but I airbrushed it with two colors of Copics (thanks, Katie, for the suggestion!) to tie it in with the teapot.  There are two little brown pearls in it signifying tea.  

That's one of the custom colored cherry blossoms.  Of course I had to put a little glitter on the stamens...

This will go up for sale in my brand new Etsy shop today.

Thank you for joining me, and I wish you lots of fun crafting goodness in your week!

Happy crafting!

Saturday, January 25, 2014

Pulling the Trigger on Our New Shop!

Hello!!

We finally did it!  My daughter, who is my crafting partner-in-crime, and I have joined forces and opened our own Etsy shop!  We are SO excited!  Our name is Vintage Rose & Aster and will be filled with the things we love to make.  There are handmade greeting cards, mosaics with vintage and vintage style jewelry, altered art, and all manner of artful, vintage, shabby chic products! 


We have been working for the past 8 months to build our inventory and it is finally coming together; from time to time the third generation crafter in this family, my very talented and published mother, will be contributing her delightful projects as well.

So please feel free to drop by and take a look, and if you see something you like, great!  If not, feel free to say hi through our email address vintageroseandaster@gmail.com or send us a convo through Etsy.  We will be adding much more over the next few days!

Happy crafting!!

Tuesday, January 21, 2014

Christmas Angels

Hello!

I'm telling you, it's not my fault that I'm still hung up on making Christmas pretties, it's all that Heather Hudson's fault, what with her gorgeous collage papers and all.  I've been guest designing for her new challenge website (My Artistic Adventures Challenge which you can find here), and her papers are sooo pretty that I just had to make another project with them.

This is my Christmas angels wall hanging and I used her Peace On Earth Christmas Angels collage sheet.  The soft pastels are so delicious I couldn't resist playing around with them.


 Here's a picture of the collage sheet:

Vintage Angels Peace On Earth  Christmas Tree  tag Ornament  Digital Collage sheet Printable

See what I mean?  I used some of the smaller pieces on my ornaments in my last post (here), but I really wanted to use those stars and the angels as well.


All of the stars are double-sided, and the largest star has a thin piece of chipboard (from a cookie box) in the middle to give it more stability.  I edged the star with pearls on a string then placed the angels on top with a bit of hand-dyed cheesecloth underneath.

I'm a big fan of rosettes and made a large one to support all the other pieces.  This rosette is approximately 6" wide and has been dusted with champagne glitter and edged with gold glitter glue.


You can see a bit of the cheesecloth here.  The bow, called a "Colleen Bow" (directions here from my lovely friend Colleen Dietrich), is topped with a scrap of faux vintage tinsel and then the "Peace on Earth" greeting.  I've also used a couple of die cut flourishes cut from gold metallic card stock and which I first painted with clear crackle paint (Tim Holtz) then rubbed with a bit of Vintage Photo distress ink.

By the way, all stars are edged with a line of glitter, and the angels' clothing and wings have been "glitterized" a bit too.


This middle star has a small little jewel charm made for the occasion.  The center flower is a flattened bead cap which started out silver but was turned to bronze courtesy of my trusty Copics.  I've topped it with a small flat-back pearl.


The tiniest star also has a flattened, colored bead cap in the center.  The charm was made with a tassel I rescued from a pair of earrings I used to wear in college.  Some might call it vintage even though it feels like it was just yesterday that I was wearing them.

By the way, the hanger is made from a piece of costume jewelry.  Not vintage, just something I don't wear anymore.

And that, lovely readers, is my project for today.  Thanks for joining me and feel free to pop on over to Heather's challenge site to contribute your own Christmas creation.

Happy crafting!


Challenges:

Craft-Dee BowZ January challenge - Anything Goes + handmade bow
Oldie But A Goodie - Recycle
Divas By Design - Use Ribbons
   

Thursday, January 16, 2014

On the first day of Christmas...

Hello!

Can you believe I'm already posting about Christmas again?  I'm the world's biggest "thank goodness the holidays are over" kind of gal, yet here I am, making Christmas ornaments.  OK, it's not my fault, my lovely friend Heather Hudson of My Artistic Adventures is hosting her second challenge on her new challenge blog, the theme of which is "On The First Day of Christmas."  The timing couldn't have been better as I had recently seen her tutorial on making gorgeous glitter Christmas ornaments (here), so...how could I not make some too?


These little cuties lend themselves to all sorts of embellishments, and I chose two of Heather's collage sheets for mine.


Vintage Angels Peace On Earth  Christmas Tree  tag Ornament  Digital Collage sheet Printable 

and


https://www.etsy.com/listing/170125119/vintage-classic-candy-cane-christmas?ref=shop_home_active_1&ga_search_query=Christmas


Lots of possibilities with these sheets!


I used a tiny tag on this one after first covering it with Glossy Accents for shine and durability.  Some vintage lace trim, silky crinkly ribbon and a button attached with a bit of baker's twine finishes it off.


The level of detail in her bits and pieces is amazing, even the tiniest ones.


I edged the sentiment blocks with some translucent glitter.  Some seam binding, a flower and two of the teensiest little jingle bells I've ever seen complete this little darling.  Oh, and some pink hand-dyed cheesecloth for a bit of shabby charm.


I went with an unconventional color scheme here using a pinky peach and black combination.  Both the cardinal and sentiment have been covered with Glossy Accents and I finished it with black silk ribbon and two more itty bitty jingle bells.


This could be left on display year 'round if the owner so chooses.

Thank you so much for joining me today and I do hope you'll pop on over to her challenge blog and enter your creations!  After all, there are only 349 more days until Christmas!  (The challenge runs from today, Jan 16th, to Feb 14th at 12am EST.)

Happy crafting!


And don't forget the coupon code good for  15% off a $5.00 or more purchase in Heather's Etsy shop
MYARTISTICADVENTURES


Challenges:

ABC Christmas Challenge - "A" is for Anything Christmas


Wednesday, January 15, 2014

Custom Colored Flowers at Shea's Lounge

Hello and hooray!

My computer troubles are over at last!  My darling son built me a brand new one after we went and shopped for all the components a week ago.  What an education.  And since hardware is his specialty but software is not, my husband brought in his good friend and computer expert to transfer the files over.  As ANY crafter knows, we have files.  Boy, do we have FILES.  Zillions of them.  Two day's worth of transferring and tweaking.  And our hearts palpitate at the thought of losing even one teeny tiny one.  I was assured no files would be lost.  And the long and short of it is, none were (though there were a few heart-stopping moments yesterday when I thought some were missing, but the Silhouette store is a champ at letting us recover everything we've ever bought).

It was up to me to download all of the external softwares again, including Adobe Photoshop (nothing nice to say about them or their "customer support"), my Silhouette Cameo, my Viking embroidery machine and my digital camera.  Good thing I know how to do all that because I had this project to do and limited time in which to do it, but all is well, I'm back up to speed, my craft room is humming again, and I have a fun tutorial to share with you that I've posted over on StampNation today!


The lesson is how to custom color purchased flowers to fit your color scheme, and I do hope you'll pop on over to take a look!

The stamp is Papaya Collage by SU, the flowers are from WOC, and the paper is "Madeline" by Prima.  It is such a beautiful print that I let it do most of the work. 


I applied a bit of glitter to this flower as, even with all the color and pattern, I felt this section was a bit "flat."


I finished the inside with a bit of stamping.  This card will go to a friend who fell down her stairs and broke her foot last week.  Thought this might cheer her up.

Thanks for popping in and I do hope you join us over at StampNation!

Happy crafting!

Thursday, January 9, 2014

Forced Down Time

Hello!

Just a quick note to say that I will be computer-less for a couple of days (I hope just a couple) as this poor old gal is on her last desperate gasps (the computer, not me) and needs a good replacing.  So my darling son is coming over today to build me a brand new one.  Hooray.  He's a hardware kind of guy and I have to have a second person come in to transfer all the jillion and zillion files and programs over to the new one.  The software guy won't get started until late tomorrow and may even keep the new baby until Saturday.  Horrors.  How will I manage?

And I remember the days when I said "I don't need no stinkin' computer."

So until then, please enjoy my sweet little puppy in some of her latest antics.  Well, "little" is used loosely here.  She was weighed this morning and came in at just over 53 pounds.  And still growing.

Christening the new chair

She decided she needed to sit in my new knitting chair before I had the chance.  It was a consignment store purchase and seems to fit her nicely.  At least when she sits up.

Crafting companion

She likes to keep me company when I'm crafting.  Never mind that I need to figure out where to put my feet.  That's not her problem.

Mama's helper

I was folding the blanket which emulates "snow" under the Christmas tree, and she wanted to try it out.  I'm convinced she's part cat.

I will hopefully be back up to full speed by Saturday evening (fingers crossed!), so until then, I wish you a lovely rest of your week.

Happy crafting!


Monday, January 6, 2014

Vintage Banner

Hello!

I hope this finds you well and enjoying your new year so far.  Our house is getting back to normal and I am back in my craft room enjoying the "piece of quiet" that has signaled the end of the holidays.  Hooray.  I love the holidays, but I also love the quiet that comes afterwards.

I've been in a bit of a banner-y kind of mood lately, the kind that lets all who enter my office know exactly who is in charge.

Note the Scrabble tiles on the shelf.

You might remember the last one I put up, the one that spelled out "Queen" in glitter letters back in November.  Well.  I wasn't overly fond of the paper, there was too much white in it (and I am a sucker for color, especially the soft, vintage kind), so I gave that banner to my darlin' daughter and made another one for myself.  This one uses the beautiful collage sheets that my good friend Heather Hudson makes and sells in her Etsy shop.

 
The base heart shape, which you might recognize from my tussie mussie project, was made using Heather's Vintage Victorian Valentine collage sheet, which you can find here.  It comes in this lovely soft aqua as well as a cream, pink and red version.  There are other items on the sheet as well, very useful for a variety of projects.


The letter panels were taken from her Vintage Shabby  Chic Roses Collage Sheet.  Aren't they positively gorgeous??  Of course I glittered the letters with vintage glass glitter, the kind that gets stuck in, really IN, your fingers if you're not careful; however, the vintage sparkle they give off is delightful.

All paper edges were inked with a rosy brown chalk ink, and if you look closely, you can see the pink, sparkly Fantasy Fiber from Art Glitter which I adhered to the backs of the base panels so they would peek out around the edges a little bit.


The tops of the hearts were trimmed in leaf ribbon and tiny flowers, both found at Really Reasonable Ribbon.  Some shimmery ribbon connected them all.

Interesting note: I was unable to tack the banner in place and broke two used sewing machine needles trying to pierce the wood (it's very hard wood), so I used some super sticky glue dots instead.  This baby will go nowhere until the Queen says it will.


And that, lovely readers, was yesterday's project.  It's really quite a simple one, though with all the interruptions afforded by my bored puppy, it seemed to take all day.  (More on her another day.)

Here's wishing you a fabulous day full of crafty goodness!

Happy crafting!

Challenges entered:

My Artistic Adventures #1 - Love or Valentines
Really Reasonable Ribbon #86 - Pink and Ribbon
Sugar Creek Hollow #77 - Something New (New Digi papers, the ones with the letters)
613 Ave. Create #53 - Anything Goes w/optional theme (I did not do optional theme)
The Shabby Tearoom #200 - So Romantic

Thursday, January 2, 2014

A New Challenge Blog

Hello!

The holidays are over, New Year's Day is behind us and it's time to usher in the new year with a fun project to celebrate my good cyber friend Heather Hudson's brand spankin' new challenge blog, My Artistic Adventures Challenges (full description here).  It's all vintage all the time at her blog My Artistic Adventures and she creates the most amazing projects!  I am continually inspired by her delightfully clever creations, and I know you will be too!  I was honored to be asked to be a guest designer for her very first challenge and jumped at the opportunity to work with her collage images which can be found in her Etsy shop here.


This is a Tussie Mussie, a darling little paper cone that was used in Victorian times to hold a small nosegay but which nowadays can be used to hold any number of treasures.  I've used the Romantic Roses template in Heather's Etsy shop as the base, and then I've decorated it with images from several of her other collage sheets (all will be listed and linked below).  These colors, the softs pinks and greens, are the colors that make my heart happy, and it was a dream working on this project.

Isn't she sweet?  I trimmed her hat and little hiney cover with pink glitter and tucked her in behind one of the hearts that fits over the base shape.  Each side of the tussie mussie has hearts in different colors - two pinks, one cream and one blue/green for added interest.  I popped them all up on dimensionals for added depth.


Here are some of the words from the collage sheets.  The mulberry roses have inked petal tips to which I added a bit of glitter, and the base heart shapes were edged with frantage mica fragments for a little definition.  Pretty much all paper edges were inked with a soft brown chalk ink. 


The small flowers were pink and white but were a bit too bright, so I lightly painted them with a bit of wheat colored shimmer paint to tone them down and warm them up a bit.  I added multi-loop bows behind roses on opposing sides made from the same ribbon as the hanger (tucked inside).

See the little heart at the bottom?  Yep, more of Heather's vintage Valentine goodness.  What's even more fun is that they open up!


Here's one closed.  I added dimensional foam adhesive to pop the image up from the base a bit.


And here it is opened up.  Heather offers little Valentine conversation hearts that will fit inside, but I decided to add my own personal greetings this time.


Here's another one...


And still another one.  Hey, it was 2013 when I made it.  <smile>  I painted the insides of all little heart folders with pink shimmer paint as the white paper was a bit too bright.

By the way, I took a technique from Heather's playbook and added vintage green glass glitter to the leaf ribbon that twines around the tussie mussie.  It adds a nice additional layer of sparkle, and you can never have too much sparkle.  At least not in my book.


The vintage lace trim around the top was a fortuitous find at a flea market a couple of months ago.  It matches the paper exactly!  Some hand dyed seam binding completes the look.  There is also a seam binding loop with which to hang it, but I don't have a single place in my house that affords a decent photo op for hanging things, so I haven't included a picture.  I will make it a New Year's resolution to be able to take better photos of projects that hang.

I hope you've liked my little tussie mussie and are inspired to join me on Heather's challenge!  Full details can be found here!  And there's even a lovely new badge to display on your blog!  The HTML code can be found on Heather's blog!


Happy crafting!


Images used:

Romantic Roses Blue Green Victorian Vintage Valentine's Day Heart Shaped Cone Tussie Mussie Digital Collage sheet Printable

Conversation Hearts Images Card bases VintageValentine's Day Valentine tags Digital Collage sheet Printable 

Romantic Focals Cupid Text Boxes for Victorian Vintage Valentine's  Tussie Mussies  Heart Shaped Cone Digital Collage sheet Printable 

Challenges entered:

Really Reasonable Ribbon #86 - Pink and Ribbon
Simon Says Wednesday Challenge - Something New (new digi papers, guest designer for Heather Hudson's new challenge blog)
Pile It On #48 - P is for... (pink, posies)
Frilly and Funkie - New Year's Resolution (to make more altered art and 3-D pieces, fewer cards)