Followers

Click on photos to enlarge.

Tuesday, April 30, 2013

Foil Flower at Creative Inspirations

Hello!

Today I'm going to share a fun, recycling idea.  Earth Day was April 22, and many of the challenges for the past couple of weeks have centered around recycling household objects.  I was sharpening one of my punches using 8 layers of aluminum foil, and as I was looking at the punched pieces, an idea began to form:  scallop circle = flowers!


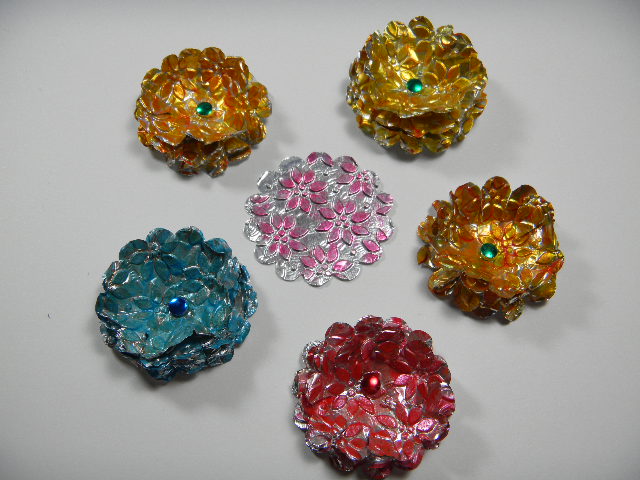
First I embossed the shapes for texture, then colored one with alcohol markers but wasn't really happy.  (That's the flat one in the center.)  I knew Creative Inspirations Paints would be better, so I first connected each set with a brad and then fluffed the layers bit by bit.  Fluffing that many foil layers is a bit tricky because each layer is so light and fragile, but the end result is rather fun, especially when you see the before and after.  After fluffing, I started painting using solids on some and blending colors on others (red and yellow)


I had a bit of misfortune when stamping the greeting.  I stamped it incorrectly the first time (crooked and too faint), but rather than put the piece in the scrap bin, I turned it around and stamped it again.

I also dry embossed the layer with a striped embossing folder, but, er, um, it doesn't show up.  Gee, I wonder why...


The red panel with yellow borders covers the stamping goof right up.  Seen from this angle, you can see the dimension of the foil flower and how the entire layered piece is popped up on the base of the card.


And here's a close up of the flower.  I love how the silvery foil contrasts with the paint colors on the various flowers, in this case blue.  I used a blue Metallic Inspiration in the center and some red ones along the yellow borders.  A little baker's twine and some Jeweled Inspirations at the top complete this card.

Thank you for joining me and I hope you'll visit the Creative Inspirations store to see all of their shimmery, glittery offerings.  And don't forget to visit the Creative Inspirations challenge blog as well - this fortnight's theme is Inspired By: Anything Goes.

Happy crafting!


Challenges entered:

Love to Create #63 - Punches and/or Dies
Simon Says...Anything Goes
Charisma Cardz Challenge #16 - Polka Dots
Crafty Ribbons #44 - Anything Goes w/Ribbon (does twine count?)
3 Girl JAM #17 - Anything Goes w/Ribbon (does twine count?)
Eclectic Ellapu - Anything Goes

StampNation Challenge #5 - sketch


Monday, April 29, 2013

Little Graduate - Digi Darla Challenge #60

Hello! 

It's time for another challenge over at Digi Darla's Challenges, and this week's theme is Challenge #60 - "Celebrate!", which can mean any occasion for which one celebrates, be it a birthday, graduation, etc.  One winner will receive 5 Digi Darla images, and any entries using a DD image get entered into a SECOND drawing for 3 images, so you could conceivably win 8, yes, eight Digi Darla images!  It's happened before!

 If you use a Digi Darla image, make sure after you link up to add DD with your name so we won't miss you!  

You have until May 4, 9:00 PM EST, to link up to the Digi Darla website.


My card today is a graduation card and features the stamp "Grad Girl" in honor of my daughter, who will be graduating from college on May 10th.  Hooray!!  She and I will be so glad when she doesn't have to make the long commute anymore, not to mention she will finally have some free time on her hands considering she also works full time.

Isn't she cute?  Now to find a stamp showing a parent jumping up and down with glee and shouting,"It's over!  Woohoooo!!!"

*ahem*

I've colored her with Copics in her school colors of burgundy and white.  The background on the white layer consists of swirls stamped with Versamark and then dusted with white Perfect Pearls.

I fussy cut the mortarboard and popped it up.

The diploma is vellum tied with a bit of gold cord.

A red satin bow and some red rhinestones finish this little card off.

Thank you for taking the time to join me, and if you have a graduate in your family, kudos to you for getting through it and surviving! 

Happy crafting!


Challenges entered:

Tuesday Throwdown #144 - Make Your Own Background
Ladybug Crafts Ink Color Combo - Red and White
Simon Says...Anything Goes
Divas By Design - Inspired By a Move ("The Graduate")
Crafty Ribbons #44 - Anything Goes w/Ribbon
3 Girl JAM #17 - Anything Goes w/Ribbon
Eclectic Ellapu - Anything Goes

Saturday, April 27, 2013

Live Every Moment

Hello!

Just thought I'd share a quick card I made today "just because."  It started out with pink cardstock and floral dp, and ended up being masculine instead.  It always amazes me when a card takes on a life of its own.

It happened because I wanted to use the colors in this week's color challenge over at Splitcoast Stampers, Nearly Navy, River Rock and Baja Breeze.  The stamps are all from Inspired by Stamping, including Amazing Inspirations and the ever lovely Elegant Flowers, which I embossed using blue ep.

I wanted to try something that I'd been thinking about every time I die cut a certain flourish, and that is to use the negative image as a stencil.  They're so pretty and I thought they'd make a nice background for a rather CAS layout.


I airbrushed the layer first with a golden brown Copic marker, then with a navy, having moved the stencil a tiny bit.  I like the effect, and it's a nice way to recycle a piece of waste paper, don't you think?


The greeting was stamped, then diecut with IBS Fancy Labels Dies I, with a second layer behind it.  The blue cardstock is also a recycled piece, having been a layer that I had lightly embossed months ago but for which I never found a use.

A couple of antique brads and a snippet of IBS Cream Crochet Lace finish things off nicely.

Thank you for joining me today, and do stop over at Joanna's blog to see the latest and greatest.

Happy crafting!


Challenges entered:

SCS CC423 - Not Quite Navy, River Rock, Baja Breeze
Tuesday Throwdown #144 - Make Your Own Background
Simon Says...Anything Goes
Divas By Design - Inspired By a Movie ("The Rose")

Friday, April 26, 2013

Inspired By Stamping April Challenge - Washi Tape

Hello and good morning!

I want to draw your attention to a fun challenge over at Inspired By Stamping.  The challenge is to use washi tape on your project, whether it's real tape or the fabulous new stamp set released earlier this month by IBS.  Can you believe a washi tape stamp set?  Having just barely joined their DT, I don't yet have the set, but I will soon have it and will finally be able to customize the look of washi tape to MY specs.  I've yet to find washi tape that I really love, but this stamp set will totally fill the bill.  (Or is it "fit" the bill?)  But let me say that you don't have to have the set - any washi tape will do, even handmade.

At any rate, please head on over to Joanna's blog and get crack a lackin' so you can have an opportunity to win a $15 gift card to the IBS store. Two winners will be randomly drawn.

Deadline has been extended to May 10, 1pm Brisbane time, or 11pm EST May 9.  There's still plenty of time!

For full details of this challenge, please visit Joanna's blog here.  And for fantastic samples from the DT, please visit their blogs via the links on my sidebar.  These ladies do fantastic work!


Inspired-by-Stamping-April-

Tuesday, April 23, 2013

Shimmer Flowers

Hello!


Today is my first project post for the Creative Inspirations blog.  If you've ever wandered around my blog, you'll know that I use these paints and products a LOT.  They're so sheer and shimmery that I can't resist adding them to many of my cards.

 Inspirations

Today's card features some fun flowers that I made using several colors of CI Paints and the Tim Holtz Tattered Flowers die.


Normally I like to use lots of texture and patterns, not to mention glitter and shimmer, on my cards but this flower is so colorful that I decided to let it stand alone (almost).  It was so much fun! 

First I die cut all of the pieces several times each out of patterned CS, then I sprayed them with water and scrunched them to give them, well, a tattered look.  They are very fragile at this stage and easily susceptible to tearing, as you can see on the green flower with the long, thin petals.  Not a problem, the torn off petal can be attached later.

I painted them with multiple layers of paints, first with Tutu Pink around the centers, then Sky Blue, Mellow Yellow, and Sage for the appropriate colored layers.

Then I layered them, centering them with a pearl.  See how the patterned papers show through the layers of paint?


Here's one closeup showing the shimmery goodness...

...and another closeup showing the patterns.

And that was all there was to it!  I have lots of flowers left over for future projects as I got a little carried away while making them.

The rest of the card was simple.  A quick run through the Big Shot for the base layer with a dot embossing folder, a simple sentiment enhanced with pearls from my stash, and some Metallic Inspirations matte brads finish this simple, yet still colorful card.

Thank you so much for joining me and I hope we see you over at our latest CI Challenge, the theme of which is Anything Goes!

Happy crafting!


Colors used:

Sage, Sky Blue, Tutu Pink, Mellow Yellow


Challenges Entered:

Simon Says Stamp and Show - Color
Inky Impressions #105 - Punches/Dies
Allsorts #203 - A Passion for Flowers

Monday, April 22, 2013

Winged Sentiment - Challenge Day at Digi Darla's

Hello! 

It's time for another challenge over at Digi Darla's Challenges, and this week's theme is Challenge #59 - Earth Day, which requires at least one thing recycled on your project.  One winner will receive 5 Digi Darla images, and any entries using a DD image get entered into a SECOND drawing for 3 images, so you could conceivably win 8, yes, eight Digi Darla images!  It's happened before!
If you use a Digi Darla image, make sure after you link up to add DD with your name so we won't miss you!  

You have until April 27, 9:00 PM EST, to link up to the Digi Darla website.

My card today is using wings again.  I guess I'm in a "things with wings" kind of mood lately.  The DD image is actually a sentiment, "Good Friends Are Like Angels," which you can find here.  Sometimes I don't want an image so much as I want to just say something, albeit with a bit of decoration.  (A bit?)

My recycled item is the large pink and white flower, for which I used a piece of cardboard from a shipping box, and said box contained craft supplies.  Fitting, right?  I should have taken pictures, but I think we all know what corrugated cardboard looks like.  I first dry brushed it with white acrylic paint, then dry brushed it again with pink, then when that was dry I ran it through the Big Shot to flatten it before die cutting the shapes.

 
Here's a closeup showing the flower with the rhinestone brad in the middle and some of the hand dyed flowers surrounding it, plus a little of the tulle that's behind it.


And here's a close up showing the rest of the flowers.  I colored white and tan flowers with Copics and alcohol as one would use watercolors, dipping the brush in alcohol, then in some Copics ink that was smeared on an acrylic block.  The colorful edges were done with Copics dabbed on afterwards.  Perfect Pearls comprise their centers.  

And here you also get a close up of some more of the wonderful, hand made lace that I recently bought at an antiques shop.  I probably bought 6 or 8 different kinds which you will be seeing in many, many upcoming projects.  The lady who made them had no idea how far and wide her lovely laces would travel!

Here you can see the two dp's which I stamped with coordinating inks and also DI in the opposing corners.  Gives the dp a little more depth.  And see that wonderful leafy ribbon?  That comes from Really Reasonable Ribbon, as do the green ribbons behind the main flower.

 
The "image" was colored with Copics, sponged with distress inks, and layered atop the wings.

And that, my friends, is my little card today.  I'm not really sure how I'm going to mail it as I don't have any plastic card boxes big enough.  I guess it'll get very special packing.

Thank you for taking the time to join me today, and do visit the Digi Darla challenge to see what the other DT has come up with, then do play along with us, won't you?  We'd love to see you! 

Happy crafting!


Challenges entered:

Tuesday Throwdown #143 - Focus on the Sentiment
Creative Card Crew #34 - Handmade Flowers
Frilly and Funkie - Upcycle for Earth Day
Inky Impressions #105 - Punches/Dies
Crafty Ribbons #43 - Pink and Green
Allsorts #203 - A Passion for Flowers
Fussy and Fancy #87 - Vintage

Pile It On #16 - Budding Color Inspiration


Saturday, April 20, 2013

Shabby Postcard - Challenge Day at A Gem of a Challenge

Hello!

It's time for this week's challenge over at A Gem of a Challenge, and the theme this week (Challenge #76) is "Distress It."  This challenge will run from 8:00 AM April 20 to 6:00 PM April 26, and the prize for the winner will be 2 individual digi images (NOT SETS) from Pink Gem Designs.  So do head on over and see what the rest of the lovely Design Team have created, then join us, won't you?  We'd love to see you!


My card today uses two digis from PGD, Butterfly Postcard and Keep Calm and Eat Cake.  I have quite decided I like combining digis, and these two go together like, well, cake and frosting.  Speaking of which, my cards lately seem to have had lots of "card frosting."  Guess it's a clear indicator of how I like my cake.  A little cake (or card) and LOTS of frosting (embellies).


I've noticed a lot of challenges lately focusing on Earth Day, which is April 22, and their requirements are to recycle something, which inspired me to use a couple of recycled items on this card. 

 One is the paper toweling I used for the roses. 


After spraying some ribbon with some of my homemade shimmer sprays (pink and brown), I used a paper towel to wipe up the interior of my spray box, and I liked the look on the towel, so I sprayed it a little more and die cut it with SB Rose Creations dies to make roses!  You can see where the original wiping section was, but that just gave more depth to the resulting flowers.


The other recycled item was the gold leaf I used on the buttons.  There are always "crumbs" left over when I use gold leaf, and I do hate to throw them away, so this time I used them on some buttons.


The remaining flowers were airbrushed with Copics, and the leaves were enhanced down the centers with Copics as well.


Perfect Pearls form the centers of the flowers.


And I couldn't resist a teeny, tiny gold leafed button to use as the "postmark."


Close up of the messy bow with another gold leafed button and some linen thread.  You can see the distressed edge of the base layer on which I also stamped some French script for depth, then sponged around the edges with distress inks.

And that, dear readers, is my distressed card for today's challenge.  Please do join us at A Gem of a Challenge this week - we'd love to see you!

Happy crafting!


Challenges entered:

The Shabby Tea Room #162 - Pretty Shabby (recycled paper towels and gilding "crumbs")
Tammy's Scrappin' Corner #58 - Spring Has Sprung
Tuesday Throwdown #143 - Focus on the Sentiment
Creative Card Crew #34 - Handmade Flowers
Frilly and Funkie - Upcycle for Earth Day 
Red Carpet Studio #32 - Hollywood Noir
Inky Impressions #105 - Punches/Dies
Fussy and Fancy #87 - Vintage

613 Ave. Create #15 - Sketch