Followers

Click on photos to enlarge.

Saturday, August 31, 2013

Not Your Usual Winter Colors

Hello!

Today's card is a winter-themed card using colors you don't see much on such cards: black and red with a dash of silver thrown in.  I LOVE black and red and wore it regularly back when I worked in an office, usually with silver jewelry.  It's sharp and elegant and looks good on everybody and pretty much every body.  This card fits perfectly into this week's challenge over at Loves Rubberstamps, which is to use one's favorite colors.  These are definitely mine.

The stamp set used is December 25th Labels from Inspired By Stamping and is layered onto a red circle edged with silver embossing powder.   If you'll notice, the base layer has also been edged with silver embossing powder.  That is my new favorite way to treat edges that might otherwise disappear when layered onto same color cardstock.


The embossed snowflakes were lightly sponged with a pearly white shimmer paint, and a couple of ribbon flags were attached to the image piece.

And that is my simple winter card.

Thank you for joining me and I hope you are enjoying your weekend wherever you are!

Happy crafting!

Challenges entered:

Loves Rubberstamps #67 - Favorite Color Combination
Oldie But a Goodie - Embossing
Simon Says...Anything Goes

Wednesday, August 28, 2013

Blue and Tan Anniversary

Hello!

Today's card is for the challenge going on over at Oldie But a Goodie, and the challenge is to use embossing.  I used both dry and heat embossing on this anniversary card which, incidentally, is going to my husband next week for our anniversary.  Shh...don't tell.


The edges of all the panels, including the torn edges of the sentiment panel, have been heat embossed with gold embossing powder, and the sentiment, using Inspired By Stamping's Happy Sentiments stamp set, was embossed with blue.  I bought a set of embossing powders when I first started paper crafting nearly two years ago and hardly ever use them because I don't generally use colored powders, but the blue in the set matched this card exactly!  The middle narrow panel was my own custom paper made by swiping two colors of ink pads on some beige card stock.  It's a great way to make your own paper when nothing in your stash will do.


The stars were made with craft foil, embossed in the Big Shot and then I pounded out all the dots with my grommet hammer.  They look 3-D but they're now pretty flat.  They still looked a little plain so I colored the edges with copics.

A couple of chipboard brads complete this card.

Thank you for joining me today, and I hope your day is full of crafting goodness!

Happy crafting!


Challenges entered:

Oldie But A Goodie - Embossing (the "oldie" is the blue embossing powder)

Tuesday, August 27, 2013

Shimmery Snowflakes

Hello!

Today I would like to share with you a shimmery snowflake card that I made using products from Creative Inspirations Paints.


The background snow flurries were stamped using Tanzanite paint for some lovely shimmer, and the snowflake die cut was glittered with Resplendence Angel Dust.


I embossed the sentiment with silver embossing powder and put that layer onto a navy blue mat.

And that's my simple, CAS but wintry card for you.  Thank you for joining me, and don't forget to stop by the CI Paints challenge blog and play along.  The theme is Inspired By: Anything Goes

Happy crafting!


Saturday, August 24, 2013

Pretty Martha

Hello!
It's time for another challenge over at A Gem of a Challenge, and this week (Challenge #94) the theme is "Anything With a B." This challenge will run from 8:00 AM August 24, to 6:00 PM August 30, and the prize for the winner will be 2 individual digi images (NOT SETS) from Pink Gem Designs. So do head on over and see what the rest of the lovely Design Team have created, then join us, won't you? We'd love to see you!

Today I've used the sweet, vintage image called "Martha" from the Pink Gem Designs store.  Isn't she sweet?  And my "things with a B" are the colors blue and brown, plus bows, a button and a bouquet of flowers. 


I've colored her with Copics using puff paint for the white flowers and pink Stickles on the red ones for a wee bit of sparkle. 


Look closely at the paper.  Looks 3-dimensional, doesn't it?  Actually it's newly-released digital paper, "Champagne Lace," also from the Pink Gem store.  


I colored the blue flower, which was white to begin with, using Copics and rubbing alcohol.  The seam binding was hand dyed and tied into a double bow, and a brown double bow was adhered on top, finished off with a vintage baby button.  A few additional flowers, some stitching and a couple of pearls complete the card.

Thank you so much for joining me today and I wish you a lovely Saturday doing the things YOU want to do, be it crafting, spending time with the family, or both!  And don't forget to visit us at A Gem of a Challenge and play along!


Happy crafting!


Challenges entered:

Friday, August 23, 2013

Grungy Guy Tag w/CI Paints

Hello!

I'm here today with a tag that I made for my son's birthday gift a few days ago (I've already profiled his gift card holder in a previous post).  I wanted to add a little something extra so used some of my favorite Creative Inspirations Paints for a little extra pizazz.

My gift tags have always been too small in the past, so I decided to cut one on my Silhouette Cameo so I could adjust the size to my specifications.  More real estate for more stuff.


I first sponged the base with three colors of distress inks then sponged over a stencil with more inks.  Then I sponged around the edges of each stencil opening with first Burn Sienna and then Autumn Wheat which gave the stencil some great shimmer!


I stamped the next layer then started adding the embellishments.  Copper ball chain, chipboard brads, some metal photo corners and a fun floral/burlap embellishment all came together to make a fun tag fit for a guy.


The burlap was a little too light, so I dry brushed some Burnt Sienna on it using my finger and used the scraps under the leather-look "flower."  I made the flower by misting and scrunching some circles of cardstock and layering them with a brad in the center.  Then I painted them with Burnt Clay and Autumn Wheat.  The flower winds up looking like leather every time.

The final touch was the leather cord at the top.

Thank you for joining me, and don't forget to play along in our latest challenge, Inspired By: Back to School.

Happy crafting!


Challenges entered:


Wednesday, August 21, 2013

Gift card holder

Hello!

Today I'm here today with Creative Inspirations Paints to show you a cute gift card holder I made for my son's birthday earlier this week.  He gets such a kick out of receiving handmade goodies from his mom.


I cut it with my Silhouette Cameo, the template of which included the shapes for the paper and the stars as well as the basic holder itself.  It even has a little hidden tab to keep it closed.


I stamped the striped paper with little Antique Silver stars and painted the larger red stars with Garnet, then I embossed some of them with Deliquesce Super Sparkle Red embossing powder and popped up the largest star.  Some red Jeweled Inspirations finished them off.

Thank you for joining me and don't forget our challenge this fortnight is Inspired By: Back to School.  See you there!

Happy crafting!


Challenges entered:

Oldie But Goodie - Embossing (cardstock and paints are old)


Monday, August 19, 2013

A Garden is the Music...

...flowers are the notes.

Hello!

Today I'd like to share with you my latest journal page.  I like journaling.  It's not for anyone else but me and is a way to experiment and learn about how different products and media work.  I learned a lot on this page, but first, the page itself.  Well, the two-page spread (but we'll call it a "page" for convenience sake.) 


Pretty colorful, yes?  I wanted to convey leaves and flowers blowing up and around in the breeze, and I wanted them made of different materials.  Of course there had to be birds and a white picket fence (it's my dream to own one and a house that fits such a fence). 


Lots and lots of pictures and techniques, and I won't spell them all out (I'd need more space), but the birds were made using my newest favorite technique to color them with Neocolors and coat them with three layers of UTEE.

Real music and book pages were used for some of the leaves and flowers, cardstock for others...


... a MacDonald Plaid Stamp grocery store coupon book from the 1950's was used for some...


...and there's even a bit of the back label from a bottle of Scotch whiskey. 

The base coloring was done with Gelatos over gesso, and some general stamping was done first before the flowers and other die cuts were applied. 


The fence was painted with shimmer paint, and I did some general doodling on many of the flowers.

Most everything was smudged around the edges with charcoal pencil, while the page edges were smudged with Gelatos.


I wasn't happy with the page until my daughter suggested I put a textile on it (I love textiles on paper projects), so I applied a small piece of vintage lace that my mother gave to me with spray adhesive which dries very hard and allowed me to spread a bit of clear glitter glue on with a finger.  It doesn't show up well, but it gives a lovely sparkle in real life.  There's no real reason why there should be a piece of lace on a design like this except maybe to indicate that a lace tablecloth blew off of the clothes line where it was drying.  Yes, that sounds plausible.


Pearls and Liquid Pearls finish things off.

Thank you for joining me today as I learn about this thing called "art journaling," and here's wishing you a lovely, colorful, sparkly day.


Things I learned on this piece:

1)  Don't use waterbased media as the base color when you're going to apply upper pieces with waterbased gel media.  It smears the color below (which can look nice too but is frustrating if you liked it to begin with).
  
2) Also don't use waterbase ink to stamp background images.  You lose those too.

3) Cardstock is too thick for something like this with lots of layers.  At least it was for me.  These flowers would have done well on a canvas and I would have done well to use thinner paper for the paper elements on the page.

4) Invest in another bird cage die.  I'm getting tired of this one.  :)

Happy crafting!

Challenges entered:

Altered Eclectics - Anything Goes
Simon Says Monday Challenge - Carnival (I think of the colors as such)
Fussy and Fancy #95 - Bingo Board (almost everything's there, but let's go with Pearls, Free, Lace)
613 Ave. Create - Anything Goes

StampNation - Inspiration Challenge Week 3 - Inspiration photo

Name:  8-15-13.jpg
Views: 101
Size:  20.9 KB

Friday, August 16, 2013

Sparkly Candles

Hello!

Today's card was made for this week's challenge over at Color Throwdown.  I love those colors all mixed up and just had to play along!


Aren't they fun, tropical colors?


This was a fun, fairly simple card to make but I still managed to find a way to add some glitter to it.  The stamps are all from Inspired By Stamping - Washi Tape and Creative Tags.


The candles are the washi tape stamps, and the "flames" are the wing from the Stampin' Up Bird Builder punch.  It's the perfect shape for a candle flame, don't you think?  I colored them using Neocolors and water in orange and yellow then added some clear glitter to the orange parts so the color wouldn't be hidden.  They are popped up on dimensionals for a bit of dimension.

Look close and you can see that I embossed the edges of the orange and white layers with glittery embossing powder.  I didn't want a hard glitter effect, just a subtle hint of sparkle.  All that plain paper bothered me.


I also gave the little tag the same sparkly edge treatment.  It just looked a little bare.  Popped it up too.  I was in a popped up, sparkly mood today.

And that is today's card.  No ribbon, big floral arrangements, etc.  Today I wanted something a little simpler that was gender and age neutral yet still had a bit of sparkle.  (I happen to know guys appreciate a bit of sparkle on occasion too.  Just ask my husband - he finds glitter in his hair and on his clothes on a regular basis.)

Thanks so much for joining me and have a sparkly day!

Happy crafting!


Challenges entered:

Color Throwdown #255
Simon Says Monday Challenge - Make the Cut
Oldie But a Goodie - For boys/males (SU bird punch was bought last summer)

Thursday, August 15, 2013

Acetate Flowers at StampNation

Hello!

Just a reminder today that I have posted my Acetate Flowers tutorial over on StampNation!  I blogged yesterday about this wonderful forum and the lovely lady who owns it, Catherine Pooler.  It is a membership forum, but I highly recommend that you give it a try - for just a few pennies a month, you'll have access to hundreds of highly useful video tutorials helping you to hone and perfect your paper crafting skills, plus you'll be a member of a fabulous and ever-growing community of crafters of all skill levels.  I've been a member for a year and a half and continually learn new techniques and skills that I put to use on a regular basis.  Plus it's just plain FUN to be there!  Hope to see you there!


And check out Catherine's blog, too, for more wonderful inspiration!

Happy crafting!

Wednesday, August 14, 2013

Shea's Lounge at StampNation

Hello!

Today's card is one that I made for my new post over at one of my all time favorite forums, StampNation.  I discovered StampNation in March of 2012, just two months after I started playing with paper and glitter, and I knew NOTHING about making cards.  Nada, zilch, zip.  I was dinking around the internet one night hungry to learn and discovered one of Catherine Pooler's AWESOME tutorials on YouTube.  Long story short, I found StampNation, joined up within a day or two, and I've made some wonderful friendships, learned so much about paper crafting, and even attended the First Annual Retreat in April of this year (and can't wait until next year's Retreat!).


There are now over 325 video tutorials there with more being added almost weekly - how can you beat THAT!  Catherine Pooler is a fabulous lady who knows her stuff, and she puts on wonderful tutorials that are easy to listen to and full of useful tips and tricks.  Plus she's a wonderful, sweet lady with a fabulous sense of humor, too!  (I only wish I lived next door to her.)  Her blog always has fun ideas and I urge you to pay her a visit.


Catherine has asked if I will join StampNation's Design Team, and she has graciously allowed me to have my own "column," which we've named "Shea's Lounge."  (Sorry, we just couldn't resist.)  It's a monthly column for members only in which I'll present a tutorial and a project showing the finished product.  This month's tutorial, which will go live tomorrow on the 15th, features the fun acetate flowers.  They look like glass, and the customization options are nearly endless.

I put the large one on a side-step card, the first I've ever made.  Rather than deal with the many cuts, folds and scores (I'm very measurement challenged on the best of days), I used my Silhouette Cameo to cut it for me.


Here's a close up of the flower using the Tim Holtz Tattered Flowers die, one of my favorites.


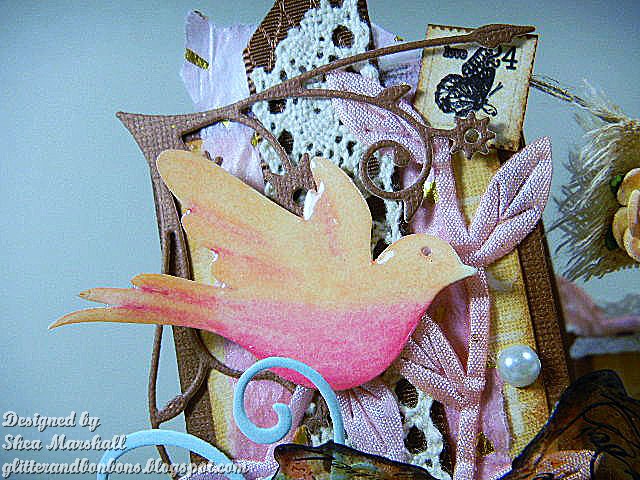
The bird was also cut on my Silhouette and painted with Neocolors, then coated with three coats of Ultra Thick Embossing Enamel (UTEE).


The little banner was made from loose canvas which I unraveled on both edges (more on the leftover pieces in a moment).  The stick holding it up is just that, a piece of a branch from my recently deceased Japanese Maple, courtesy of our Texas summer heat.  I used a miniature rose, tiny button, really tiny stamp and a flattened bead cap with a pearl as the ornaments.  Oh, and a really REALLY tiny, glittered butterfly.


Remember the trimmings of the canvas flags?  I used them to make a tiny bird's nest and airbrushed it with Copics.  The flowers are airbrushed, and the tag behind the flowers and sentiment is stamped and distressed.  The little sentiment tag is a tiny piece of wood that I painted with shimmer paints and stamped and then doodled the edge designs with a Copics marker.


Some pearls, a gold leafed button, and various seam binding and crochet ribbon and flourish die cuts complete this fun piece.


Here's a side view so you can see the "steps."  It was my first side step card but not my last - it was SO much fun to decorate!

Thank you so much for joining me and I urge you to go pay Catherine Pooler a visit, either on her blog or on StampNation, or both!

Happy crafting!

Challenges entered:


Simon Says Monday Challenge - Make the Cut
Creative Card Crew #42 - Banner/Pennant
Crafty Ribbons #56 - Anything Goes w/Ribbon
Fussy and Fancy #95 - Bingo Board (full house - it's ALL on there!)
Pile It On #32 - Outdoors
613 Ave. Create - Anything Goes

Tuesday, August 13, 2013

Last Days of Summer

Hello!

Today's card is for the current challenge going on over at Creative Inspirations Paint, the theme of which is Inspired By: "Back to School."  Except I have no one in my world who is going back to school, so I made a fall-themed card instead, and one clear indicator of fall is the apple tree full of ripe apples.

The days are still warm, the sun is still shining, there's still time to play on the tire swing but summer is starting to wind down.

I embossed the edges of the red base layer with Deliquesce White embossing powder and used a popped up die cut frame to frame the image.

I painted the leafy part of the tree with Green Olive and Evergreen, and the apples with Garnet.  Then I covered them with Glossy Accents.  Because shiny apples are the most appetizing.

I used chalks to color in the background.


Some ribbon and an apple-shaped brad finish things off.

 
A little stamping on the inside, and this card was finished.

Thanks so much for joining me, and don't forget to come play with us in our newest challenge!

Happy crafting!


Challenges entered:

Crafty Ribbons #56 - Anything Goes w/Ribbon
Fussy and Fancy #95 - Bingo Board (green, free, ribbon)
Pile It On #32 - Outdoors
613 Ave. Create - Anything Goes + optional: use school supply (only if apples count)
SSS223 - Sketch

Sunday, August 11, 2013

Snowflake Window

Hello!

Today's card is for a challenge going on over at Stamp Nation.  It's a month-long challenge with new inspiration photos every week, and the photo for this week is this gorgeous party to which I want to be invited.  Wouldn't THIS be a wonderful evening?


The colors are fabulous and I knew I wanted something with those shades of blue in the background, especially that gorgeous turquoise.


I used the emboss resist method on turquoise paper, sponging on two darker shades of blue before wiping it off the embossed snowflakes.

The window frame, cut on my Silhouette Cameo using a cut file from the Silhouette store, is silver glimmer paper from Stampin' Up!  I popped it up on dimensionals for added depth.


Did you see the fur throws on the backs of the chairs in the inspiration photo?  That was my inspiration to use these white feathers under the two glittery snowflakes.  I love the added texture the feathers give.  A rhinestone finishes this embellishment.


I wanted to finish the inside too and perhaps got a little carried away with stamping, but that's ok.  I can fit the message in between, or just write over the stamping!  The snowflakes were all stamped off first to keep them light and ethereal.

Thanks so much for joining me today and I wish you a lovely, shimmery, glittery day whatever you may be doing.

Happy crafting!


Challenges entered:

Loves Rubberstamps #64 - Anything Goes
Frosted Designs - Embossing
Pile It On #32 - Outdoors (snowy night)
613 Ave. Create #32 - Anything Goes