Hello!
I do believe this makes my last vintage Valentine card for the family! I still can't say who's getting which so that those who view my blog won't know until Valentine's Day itself!
I think this one might be my favorite, but the one with the napkin background (found here) runs a close second. OK, I like them all. But this one's still my fave. Warning: there are lots of pictures in this post!
As with the other cards, this one uses the darling collage sheets that my lovely and talented friend, Heather Hudson, sells in her Etsy shop. The Bingo card, the little cupid, the "Love" letters and the curvy banner have all come from there. And all have been printed and cut with my Silhouette Cameo. I'd probably still be fussy cutting if I'd had to do it by hand...
After I first prepared the base layers by inking all of their edges, I embossed the top base layer and inked the raised areas then lightly swiped a bit of shimmer paint on them with my finger. VERY lightly. It just adds a bit to the overall texture of the background.
This cute little number is from Heather's Cute Cupid Cherubs collage sheet and I've added a bit of coordinating glitter glue to the little shorts, roses, wings and banner. I didn't fussy cut her (him?), I used my Silhouette Cameo for all of my cutting needs. I just don't have that much patience.
He (she?) is floating above one of Heather's Vintage Bingo Cards, which I've edged with bronze mica chips for a bit of frantage effect. I love frantage. I love saying the word. Fran-taaaahge...
Once again I've used letters from the Vintage Ivory Alphabet Text boxes, only this time I edged them with gold glitter glue. My apologies, I couldn't wait for it to dry completely before snapping the picture. Patience. Remember? Not my biggest virtue.
The banner is from the Romantic Banner set. I snipped off one end (you'll see it later) and inked the edges.
I took a play directly from Heather's play book and inserted a little surprise tag behind the Bingo card. I've used a tag from her Vintage Medium Tag Bases as, well, the base of the tag, then topped it with one of the oval elements from that same set.
The tiny little tickets are from her Victorian Shabby Tickets collage sheet. There are 35 tickets with various images and sentiments on them in this set - truly a versatile and oh so cute set!
Here are two of them up close, edged with clear glitter glue. A free hug to the recipient!
Then there's the big, fat, crinkly, silky bow made with the wonderful ribbon from Really Reasonable Ribbon. (The pink seam binding is from there too.) Don't you just love double loop bows? I attached a little handmade charm to it...
...as well as an even tinier metal rose charm. OK, you've probably guessed this card is going to a female member of the family. Shhh...
And that about wraps up my card except to show that I finished the inside with the rest of the curvy banner that I snipped off from the front, a cute little heart from the Conversation Hearts Images and Bases set, and some more letters. Trust the camera to point out that even wearing TWO pairs of glasses, I can't see to put them in a straight line.
That's it for today, and I thank you for joining me. This has been a fun few days playing with Heather's wonderful collage sheets. They go together beautifully whether they're holiday-related or not, and I urge you to go over to her Etsy shop and have a look around. Then go check out her blog to view her beautiful creations and don't forget to visit her new challenge website and join in the fun! This fortnight's challenge is Anything Goes, and she even offers a freebie (go here )!
Happy crafting!!
Challenges:
Crafty Ribbons #75 - Anything Goes w/Ribbon
Fussy and Fancy #106 - Vintage
Sugar Creek Hollow #79 - Love and Adore
Pile It On #5 - Add Ribbon
Eclectic Ellapu - Add Texture
Craft-Dee BowZ - Anything Goes + Handmade Bow
Simon Says Monday Challenge - Love Notes
Creative Cutting Challenge #27 - Love
Simon Says Wednesday Challenge - Have a Heart (on the tag and inside the card)
Craft Hoarder's Anonymous #1 - Show Your Style (mine is vintage, bling, and bows)
Showing posts with label handmade charm. Show all posts
Thursday, February 6, 2014
Wednesday, March 13, 2013
Paris Roses and Challenge Day at IBSIC
Hello crafty friends!
Today is my second week to play with the girls as March Guest Designer over at the Inspired By Stamping Inspiration Challenge (IBSIC) blog, and once again there is a luscious color combination with which to play. This is just SO much fun!
Aren't these colors gorgeous? I love pastels and had a wonderful time playing with the paper and embellies and came up with this:
This card needed to be a little bigger than a standard A2, so I added an inch in both directions (6.5 x 5.25 in.), and I'll be honest - there was some white involved, but try as I might, I couldn't live with it, so I "fixed" it by stamping the first layer with blue French script and then sponging the three challenge colors on top. The lace peeking out from under the pale green layer started screaming "I'm white too!" which of course then looked out of place, so it received some airbrushed Copics in pastel pink and blue. Aaaah...all better now.
White just isn't my thing.
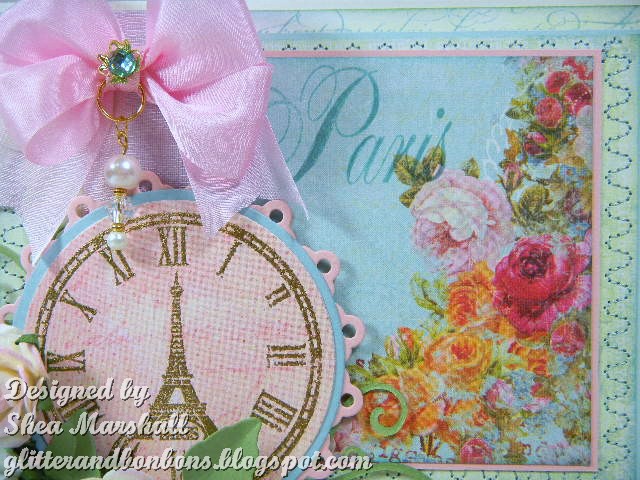
The paper with roses is from a deliciously rich pack of dp by Prima called "Annalee," and I've been eyeing this sheet of paper for the longest time until this particular sketch called out for them. How's that for making dp work for you? I stamped "Paris" (from the Paris stamp set by IBS) in Baja Breeze, but it was a wee bit faint in places so I used my SU Baja Breeze marker to darken it just a bit.
I embossed the clock face from the same stamp set with glittery gold embossing powder on another piece of dp from that same stack, then layered it onto a plain circle and a doily die cut. The first doily was white. It bothered me. I changed it.
I made the bow using some wonderful silk ribbon in my stash and hung a charm from it that I made myself, then used a gold spacer with a rhinestone for the top. For this bow I used my handy dandy brand new homemade bow maker that I was inspired to make because of Joanna's bow tutorial (here). Now granted, my bow maker doesn't look nearly as pretty and polished as the lovely one her darling FIL made for her, but it gets the job done!
I could add more holes, but I find these serve quite nicely for various size bows. The block of wood is far too long (originally meant for whittling) and you could use a scrap piece instead of wasting so much space. Hmm... maybe I'll cut it in half and make my daughter a bow maker...
The flowers are from IBS and I've added some die cut leaves and flourishes.
A little stitching and some pearls finish this card that I enjoyed making every step of the way.
Thank you so much for joining me on my wordy, photo-heavy adventure today, and please don't forget to head on over to IBSIC to play along and see what the lovely design team have created for you! They'd love to see you!
Happy crafting!
Supplies:
Stamps: Paris (IBS), En Francais (SU)
Ink: Baja Breeze, Certainly Celery, Pink Pirouette, Bashful Blue (SU), Versamark
Paper: Baja Breeze, Blushing Bride, Pool Party, Whisper White, Wild Wasabi (SU); Annalee (Prima)
Extras: Dies: Circle Stax, Dainty Doily Duo, Fancy Flourish (all Dienamics); Foliage (SB); crochet lace, Copics, airbrush, IBS roses, silk ribbon, custom charm, rhinestone, pearls, bead spacer, sewing machine, SU marker, gold ep (Zing).
Challenges entered:
The Shabby Tea Room #157 - Oh-So Pretty in Pink
Simon Says Stamp and Show - Chic to Be Shabby
Incy Wincy Designs - Things That Being With "F" (flowers, flourishes, French script)
Ladybug Crafts Ink - Springtime
Creative Card Crew #31 - Ribbon
Divas By Design - Put On Some Pink
Crafts and Me #124 - Ribbons and Lace
Allsorts #197 - Springtime
Mojo Monday Sketch #284
Today is my second week to play with the girls as March Guest Designer over at the Inspired By Stamping Inspiration Challenge (IBSIC) blog, and once again there is a luscious color combination with which to play. This is just SO much fun!
Aren't these colors gorgeous? I love pastels and had a wonderful time playing with the paper and embellies and came up with this:
This card needed to be a little bigger than a standard A2, so I added an inch in both directions (6.5 x 5.25 in.), and I'll be honest - there was some white involved, but try as I might, I couldn't live with it, so I "fixed" it by stamping the first layer with blue French script and then sponging the three challenge colors on top. The lace peeking out from under the pale green layer started screaming "I'm white too!" which of course then looked out of place, so it received some airbrushed Copics in pastel pink and blue. Aaaah...all better now.
White just isn't my thing.
The paper with roses is from a deliciously rich pack of dp by Prima called "Annalee," and I've been eyeing this sheet of paper for the longest time until this particular sketch called out for them. How's that for making dp work for you? I stamped "Paris" (from the Paris stamp set by IBS) in Baja Breeze, but it was a wee bit faint in places so I used my SU Baja Breeze marker to darken it just a bit.
I embossed the clock face from the same stamp set with glittery gold embossing powder on another piece of dp from that same stack, then layered it onto a plain circle and a doily die cut. The first doily was white. It bothered me. I changed it.
I made the bow using some wonderful silk ribbon in my stash and hung a charm from it that I made myself, then used a gold spacer with a rhinestone for the top. For this bow I used my handy dandy brand new homemade bow maker that I was inspired to make because of Joanna's bow tutorial (here). Now granted, my bow maker doesn't look nearly as pretty and polished as the lovely one her darling FIL made for her, but it gets the job done!
I could add more holes, but I find these serve quite nicely for various size bows. The block of wood is far too long (originally meant for whittling) and you could use a scrap piece instead of wasting so much space. Hmm... maybe I'll cut it in half and make my daughter a bow maker...
The flowers are from IBS and I've added some die cut leaves and flourishes.
A little stitching and some pearls finish this card that I enjoyed making every step of the way.
Thank you so much for joining me on my wordy, photo-heavy adventure today, and please don't forget to head on over to IBSIC to play along and see what the lovely design team have created for you! They'd love to see you!
Happy crafting!
Supplies:
Stamps: Paris (IBS), En Francais (SU)
Ink: Baja Breeze, Certainly Celery, Pink Pirouette, Bashful Blue (SU), Versamark
Paper: Baja Breeze, Blushing Bride, Pool Party, Whisper White, Wild Wasabi (SU); Annalee (Prima)
Extras: Dies: Circle Stax, Dainty Doily Duo, Fancy Flourish (all Dienamics); Foliage (SB); crochet lace, Copics, airbrush, IBS roses, silk ribbon, custom charm, rhinestone, pearls, bead spacer, sewing machine, SU marker, gold ep (Zing).
Challenges entered:
The Shabby Tea Room #157 - Oh-So Pretty in Pink
Simon Says Stamp and Show - Chic to Be Shabby
Incy Wincy Designs - Things That Being With "F" (flowers, flourishes, French script)
Ladybug Crafts Ink - Springtime
Creative Card Crew #31 - Ribbon
Divas By Design - Put On Some Pink
Crafts and Me #124 - Ribbons and Lace
Allsorts #197 - Springtime
Mojo Monday Sketch #284
Subscribe to:
Posts (Atom)